6 DeskTime features that help employees feel safe
So you’ve told your employees you’ll be tracking their working hours, and they didn’t cause a riot. Good.
You even sent out a memo, telling your staff of all the wonderful benefits time tracking will have like it will identify unproductive habits and analyze productivity. Everyone nodded agreeing. Even better!
Don’t be fooled though. As useful as time tracking is, it does not share the same boat of easy-acceptance with such changes in the office environment as casual Fridays and Christmas bonuses.
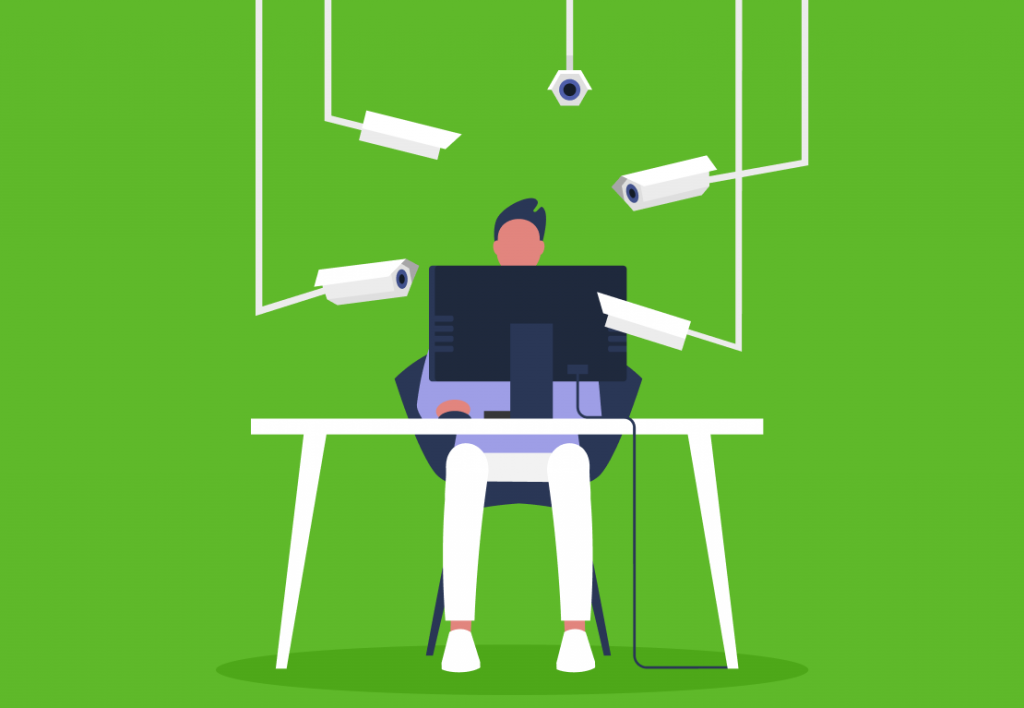
Nobody likes being inspected over their shoulder – or in this case through the screens of their computers. Only Sting can watch every breath one takes and get away with it.
That’s why it’s essential to incorporate a sort of privacy nook within the time-tracking software. These DeskTime features will set your employees’ minds at ease and make them feel secure within their working hours even with the time tracking software running in the background.
Want to get the most out of your time?
Try DeskTime for free!
Try free for 14 days · No credit card required.
By signing up, you agree to our terms and privacy policy.
1. Tracking employees only on work schedule
To get your employees feel safe around the time tracking app, it should only be working when the team is working. To clarify, employees should be tracked only on their working schedule.
No tracking after work hours. No tracking on days off or vacations. Unless you want to lose the respect of your team.
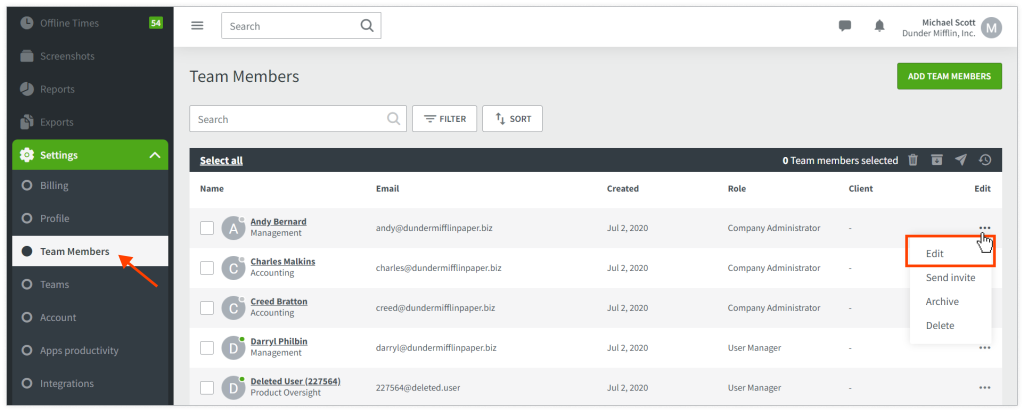
You can limit tracking for the whole company (go to Settings -> Company) or for each employee or a group of employees separately (Settings -> Team Members, then click on Edit). See image below:
You can change several settings regarding the work schedule, such as:
- Which days will be tracked
- At what time the work hours start/stop
- At what time tracking begins/stops
- How long the working day lasts
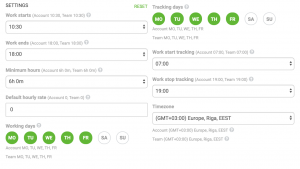
For example, if you limit time tracking from Monday to Friday from 10:30 am to 6 pm, everything the employees do before or after that time, as well as on Saturday or Sunday will not be tracked.
You can also set different times for when the workday starts/ends and when DeskTime starts tracking (Work start tracking / Work stop tracking).
Let’s say work starts at 10.30 am, but tracking – a bit earlier, at 7 am. This means that the employee can begin their workday anytime up to 10.30 am, as long as they complete their work duration goal. This feature is especially useful if the employees arrive to work and leave the office at different times.
2. Restricting DeskTime Screenshots
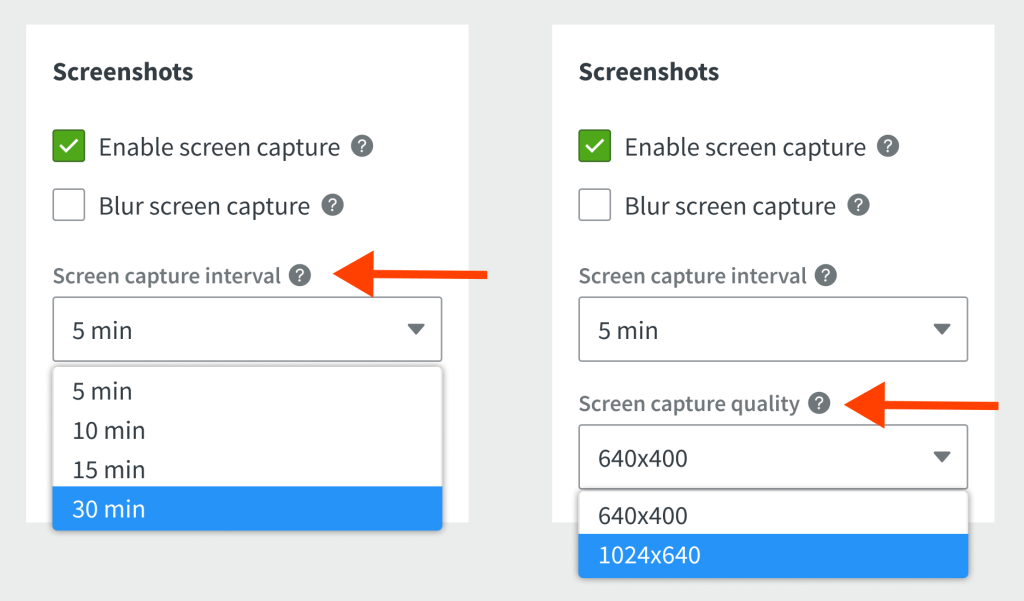
The DeskTime screenshots feature allows the account admin to capture employees’ computer screens at random 5-30 minute intervals. This gives bigger control over company’s time resources, especially if the team works remotely. You can read more about how to use the DeskTime screenshots feature in one of our previous blog articles.
However, allowing this feature to roam wild and free in your employees’ computers might also make them feel like they’re being scrutinized.
Here are several ways how to adjust the DeskTime screenshot feature so that you’re not spying on your employees:
- Set a larger interval and lower quality for captures. Instead of capturing the screenshots at a 5-minute interval (which is nearly every virtual step your employees take), go for 30 minutes. Choose the option of lower quality captures, so that you’re only casually scanning, not looking into every detail of the screenshots. You can change these settings for the whole company (Settings -> Teams) or one or a few employees (Settings -> Team Members, then click on “Edit”).
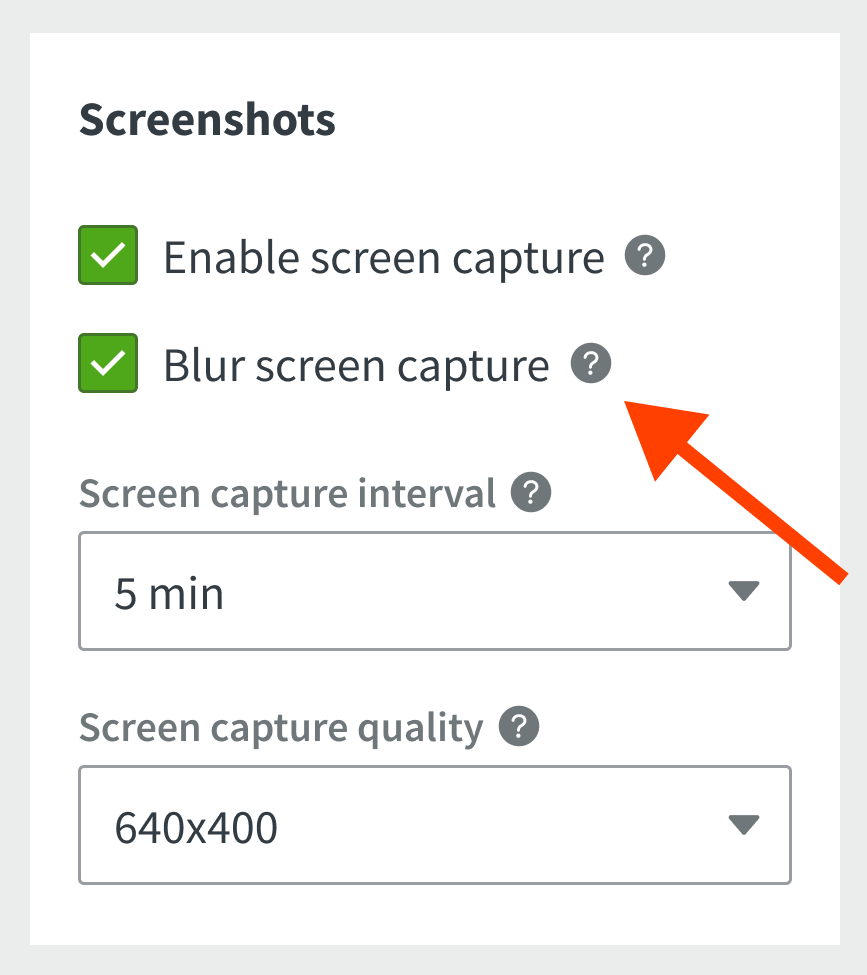
- Blur screenshots. Choosing to blur out the screenshots will let you see what apps and programs your employees open, but smaller details such as text won’t be decipherable.
To get blurred screenshots, go to Settings -> Teams or Settings -> Team Members -> Edit again and check the “Blur screen capture” box.
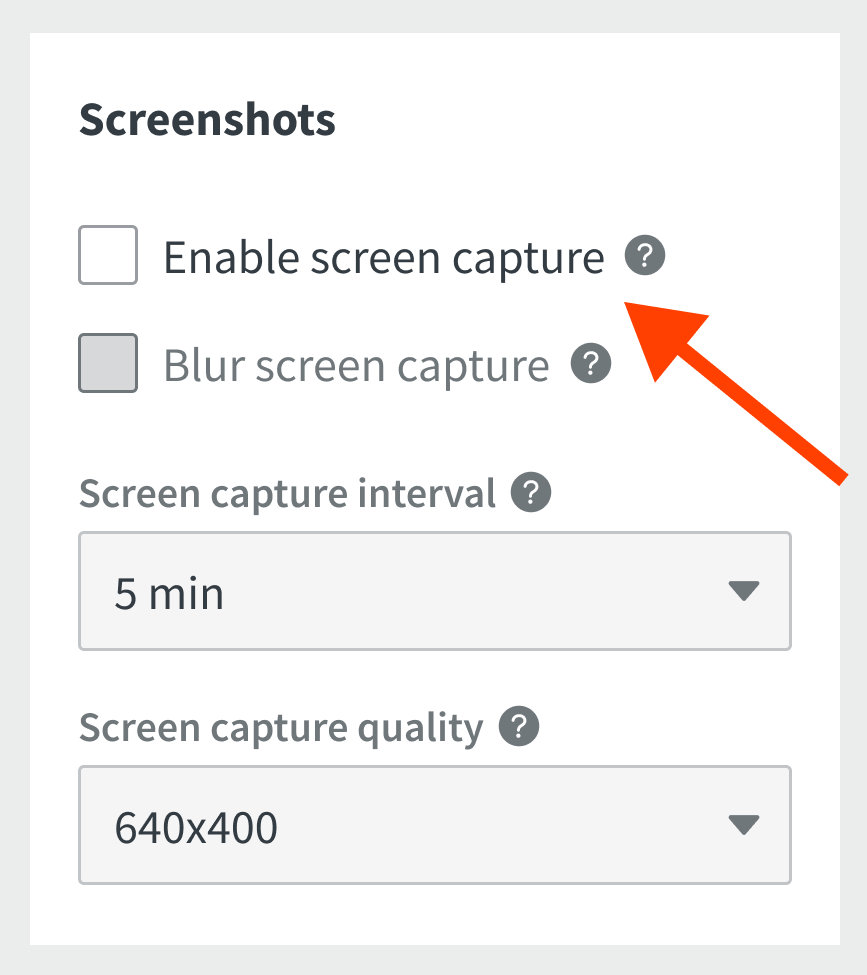
- Disable the screenshots feature altogether. If you trust your employees and there are no specific problems with slacking workers or projects, using the basic DeskTime features of time tracking might just be enough for your needs at this point. Disable the screenshots feature by making sure the “Allow screen capture” box stays unchecked:
3. Private Time
The name says it all. Private Time is a feature used for personal needs and allows the user to stop tracking anything he or she may be doing on the computer.
Private Time is a great option for shorter or medium-length breaks like checking the social media, paying the bills, reading personal emails, the news, etc. Don’t leave out the occasional YouTube cat compilation video (we all know the bite this category takes out of the total workday).
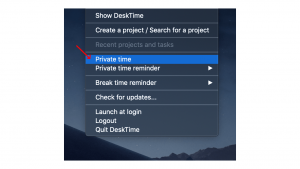
Private Time feature can easily be enabled via the desktop application in system taskbar.
Bear in mind that once Private Time is turned on, it cannot be adjusted or deleted and will show in the productivity bar. So it’s important to enable DeskTime again when returning to the workday – press the Private Time button again.
Employers have the option of preventing users from using Private time (the feature can be disabled in Settings -> Teams. However, if earning the trust of your staff and getting them to feel more comfortable with the concept of time tracking overall is your primary task, then we’d recommend leaving this feature be.
4. IP restrictions
Another way to build a secure, yet productive working environment is by tracking time only at a specific location (for example, the company office).
Enter a list of IP addresses from which employees are allowed to log the work hours. To do this, go to Settings -> IP restrictions.
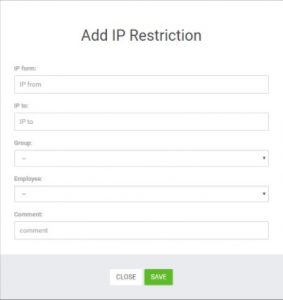
Add as many IP addresses or IP address ranges as necessary. It’s possible to add the restriction to a particular employee or a group of employees.
Not sure what your IP address is? Follow this link, and you’ll figure it out.
5. Absence Calendar
DeskTime’s Absence Calendar is a helpful little tool that kills two birds with one stone.
The feature keeps track of the days when your employees or colleagues aren’t at work. This can be anything – from longer away time like vacations and business trips, to shorter periods like sick days, parental leave, conferences, etc.
From the privacy point of view, the Absence Calendar allows employees to plan and edit their schedules, letting the team know when they’ll be on vacation or home sick. This eliminates unnecessary questions about whereabouts of absent employees and helps in planning everyone’s workload.
The absence days can be added by the admin of the page. It’s actually really simple.
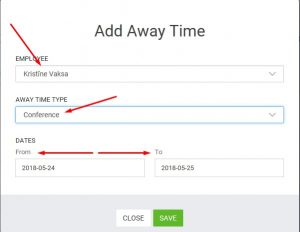
Open the Absence Calendar by clicking on the button on the left side (right above Settings). Then choose the “Add Away Time” option. All you have to do now is enter the description of the absence – the name of the employee, the type of absence, as well as the dates:
6. Offline time
There are times when employees are doing lots of work, but not exactly on their computer. So how do you track that?
The answer is – Offline time. This feature helps the user track time, spent away from the computer. Be it business meetings, brainstorming sessions, lunch, or even getting from one department to another – this can all be tracked and noted down towards the total day flow.
But how does Offline time help in achieving more privacy?
The Offline time feature allows the employees to record why they have been away for a while. Just like the Absence calendar, this helps to avoid the “where-you’ve-been” and “what-you’ve-been-up-to” questions from the management. It also builds a bond of trust among the team, as they don’t have to explain every little break they’re taking.
Here’s how Offline time works.
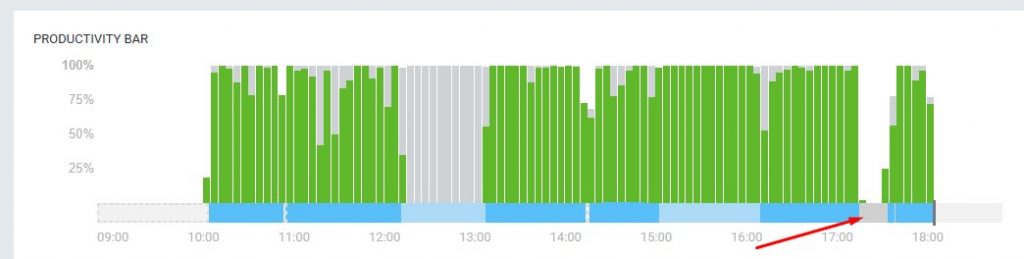
After being away from your computer, there’s going to be a gap in the Productivity bar that hasn’t been tracked. Click on it.

A pop-up box will then appear. Here, you can enter what you’ve been doing and for how long you’ve been doing it. You can either log the whole period of absence or only a portion of it, adjusting the timings by sliding the green bar.
In the description of absence window, indicate how you’ve been spending your time. For example, “meeting the IT team.” Select the productivity setting for your Offline time – whether it was productive/neutral/unproductive.

Offline time can also be assigned to a specific Project and task you’re working on. Enter the name of the project and task in the pop-up box.
No more unnecessary questions asked!
Build trust by building communication
To finalize, employee monitoring can be a tricky business if you don’t know what (and why) you’re doing it. If you as the employer are creeping too much, it can alienate the employees and coworkers.
But it’s possible to find the golden middle way. Communicate with your team. Let them know that time tracking is used for productivity purposes only. Listen to your employees if they have any doubts about time tracking or they don’t feel safe with a feature or two. Be ethical, don’t spy on every little thing people might be doing.
Do it right – and time tracking will show where improvement is needed, boosting the amount of work your company gets done in the long term.
Did you find this article useful? Give it a clap!
Psst! You can clap more than once if you really loved it 🙂