15 little-known tips and tricks to become a DeskTime power user
I’ve been using DeskTime for 8 years. And it turns out, there are still tons of features, tools, settings that I continue discovering. For that reason, I decided to survey the DeskTime team for little-known facts about how to use DeskTime to truly become a power user.
Here are 15 different tips and tricks that you may or may not have known – divided into general tips for DeskTime users, with admin tips following.
How many of these did you know? Give a clap for each correct answer you got!
Want to get the most out of your time?
Try DeskTime for free!
Try free for 14 days · No credit card required.
By signing up, you agree to our terms and privacy policy.
General tips & tricks
1. The difference between “logout” and “quit”
You know that little circle on your desktop, the one that fills up as your day goes by? The one you use to click on “show DeskTime” or to start a project or turn on private time?
Well there are two options at the bottom – “Logout” and “Quit”. Both of them fully turn off DeskTime on your desktop, but it turns out that there’s a specific distinction.
- “Logout” means that the next time you open DeskTime on your desktop, you’ll have to enter your email and password again.
- “Quit” means that you fully turn off DeskTime, but the next time you turn it on, it will remember your account and automatically log you back in. Time saver!
Since I’m the only person using my computer, now I only use “Quit”. However if there are multiple people using the same desktop, I can see how “Log Out” could be useful.
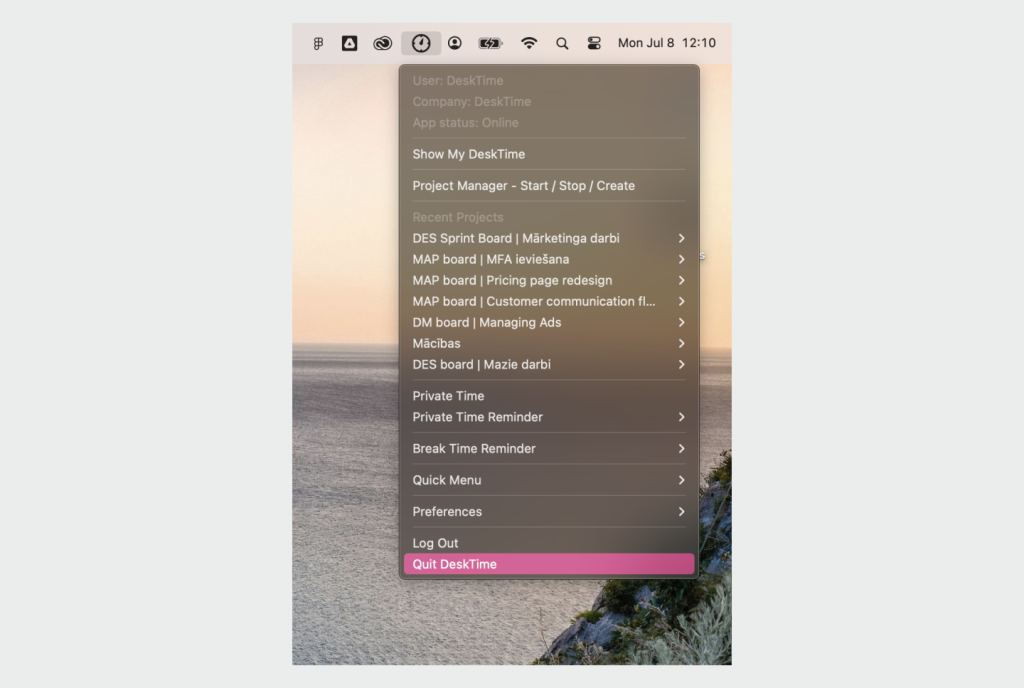
Where to find it: on the desktop app by clicking on the DeskTime icon – for Macs it’s at the top right of your screen in the menu bar, for Windows it’s at the bottom right, and looks like the DeskTime logo.
2. That filling circle represents productive time
That filling circle that Macs have on the desktop? (sorry Windows peeps, this one isn’t for you)
I used to think that it represented time spent at the computer. Turns out it’s more specific than that – it represents productive time spent at the computer during work hours.
And the circle represents the amount of minimal hours set.
Neat, eh?
Where to find it: At the top right of Mac screens in the menu bar
3. How to avoid the “barcode” effect from virtual meetings
One thing I’ve noticed since moving to a remote work environment, is that during virtual calls, when I’m not constantly touching the computer, I end up with a sort of “barcode” effect on my DeskTime productivity bar, with tiny little slivers of inactive/idle time.
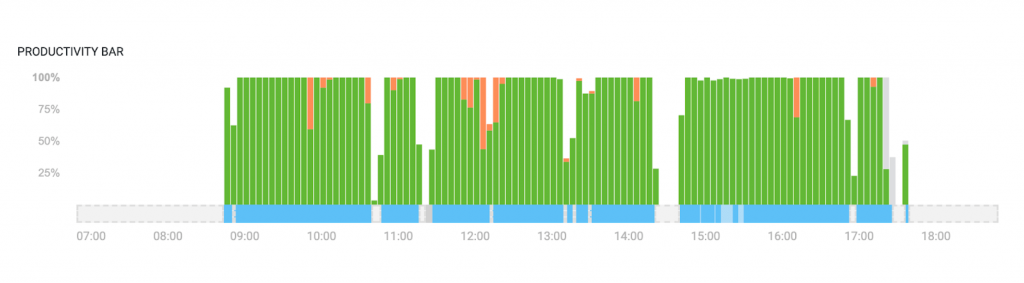
It’s not that I wasn’t working, it’s just that the nature of the work didn’t require computer activity.
To fill them in I’d have to click on each one to add what I was doing during that idle time so that it accurately reflects my day’s productivity levels. But that meticulous data entry just isn’t productive.
It turns out, there are two solutions: The solution?
- Integrating your calendar with DeskTime. The call that was scheduled in your calendar will then fill up all of the little empty slivers of time, and voila, your “barcode” is automatically filled in! Read more here.
Where to find it: Go to your DeskTime account, then click Settings -> Integrations. Activate the calendar app you use (ex. Google Calendar), and select which calendar layer you want to connect (ex. If your personal calendar is separated from your work calendar, you can choose to only connect your work calendar layer).
- Dragging-and-dropping your offline time in your productivity bar to cover the video call time period.
Where to find it: Go to your DeskTime account -> Click on one of the blank spaces during your video call -> drag the green sliders to cover the timeframe of the call -> set optional productivity category -> click save.

Want your business to thrive?
Boost your team’s productivity and efficiency ratings with time tracking!
4. Enable the Private time reminder to remember to turn it off
The “Private time” feature is awesome to get some personal stuff done. We encourage using it (and other DeskTime privacy features) at our company, because it’s perfectly human to have to get some private matters under control while you’re at work.
But it’s annoying when you turn on Private time, and then go back to work, and it turns out you haven’t turned it off. So a ton of your time isn’t accurately tracked.
Fortunately, you can turn on Private time reminders that give you a nudge in case you’ve forgotten. This has saved me countless times.
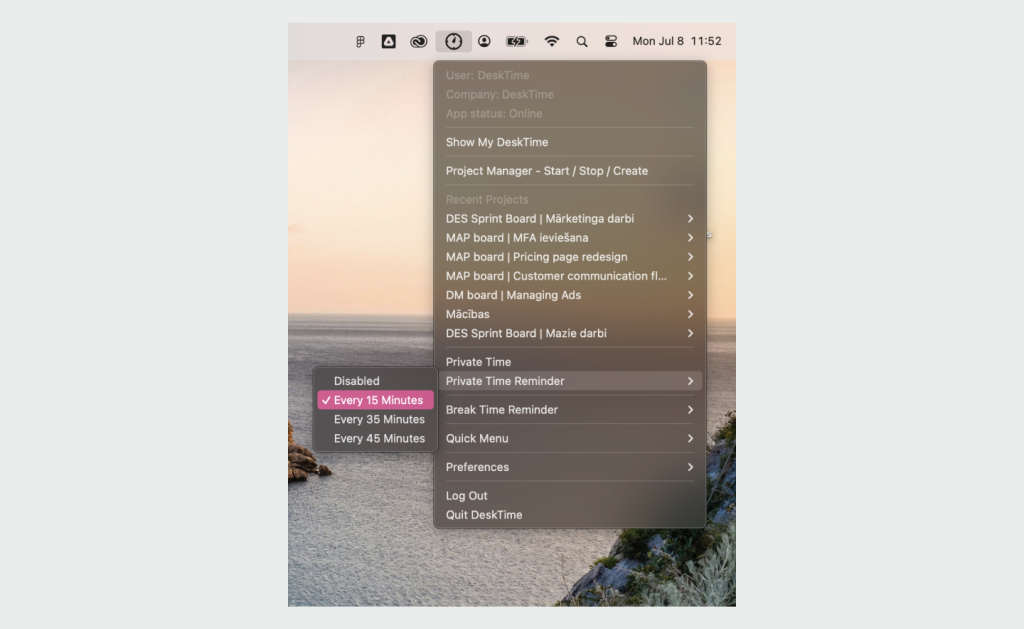
Where to find it: Click “Private time reminder” in the drop-down menu of the desktop app – for Macs it’s at the top right of your screen, for Windows, it’s at the bottom right.
5. Use the “Windows title tracking” option to calculate project times
This tip is for those professionals who work on specific projects in either a word processor or design app (ex. Word, Google docs, Illustrator, Photoshop).
By turning on “Window title tracking”, you can then hover your mouse over that app to see how much time has been spent on a specific document, with the name of the document listed along with time spent on it.
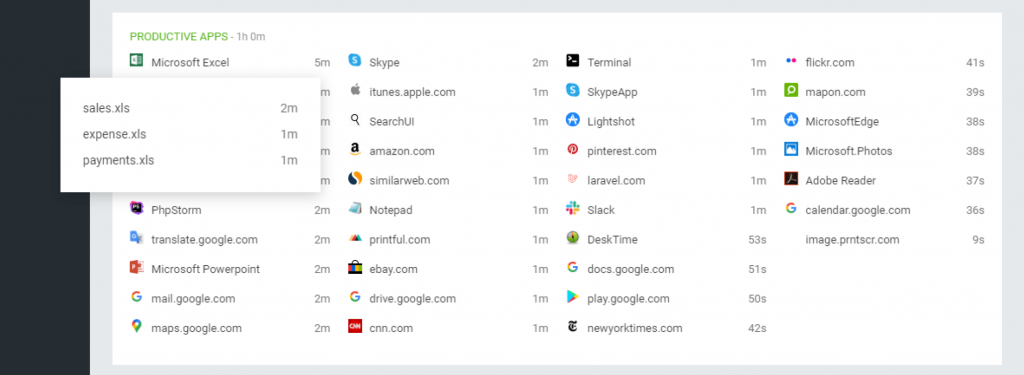
This can then serve as an accurate projection of how long it took to complete a task, which can be helpful for reporting, freelancers, agencies, and for your own time management.
You can also switch to your weekly view to see which documents have taken the most of your time.
Where to find it: Go to your DeskTime account -> scroll down to view your apps -> hover mouse over respective app.
6. Add additional contact info under “Notes”
The DeskTime “Colleagues” section serves as a digital phone book for all of your colleagues.
Not only can you easily find their emails and phone numbers, but in the “Notes” section, you can also add additional contact info, like your Skype handle, Slack name, office number, extension, or more.
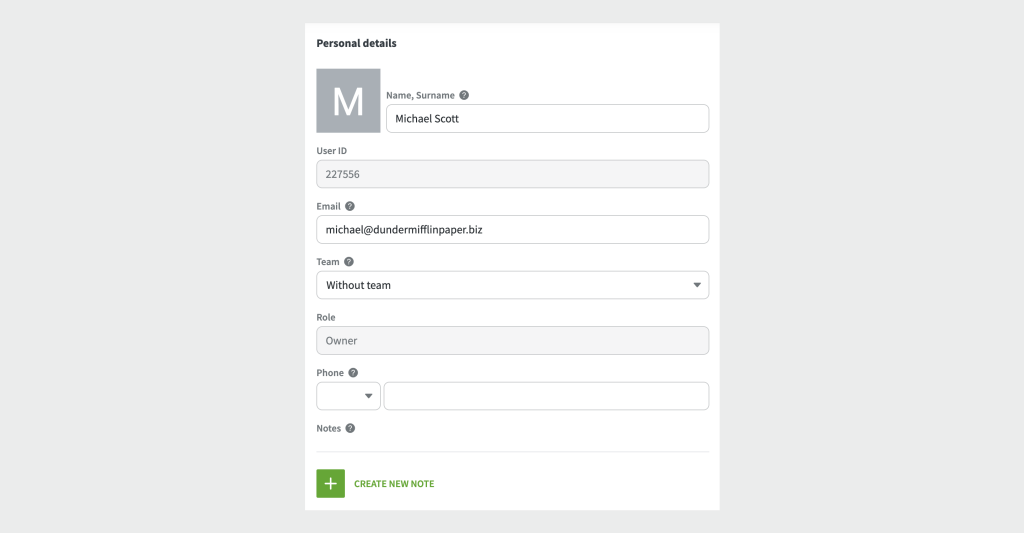
Where to find it: Go to your DeskTime account -> Colleagues to search for and click on your colleague of choice. To add your own additional info, go to Settings -> Profile -> Create new note
7. Use the Monthly view to see your overall productivity
Your DeskTime account by default shows you productivity stats one day at a time. You also have the option to choose a weekly or monthly view.
By choosing the monthly view, you get a full overview of your main productivity stats. You can also use this view to quickly jump to a specific date.
This overview helps notice any trends – such as if you’ve been staying too late at the office, or if you’ve been consistently not meeting your daily work hour target.
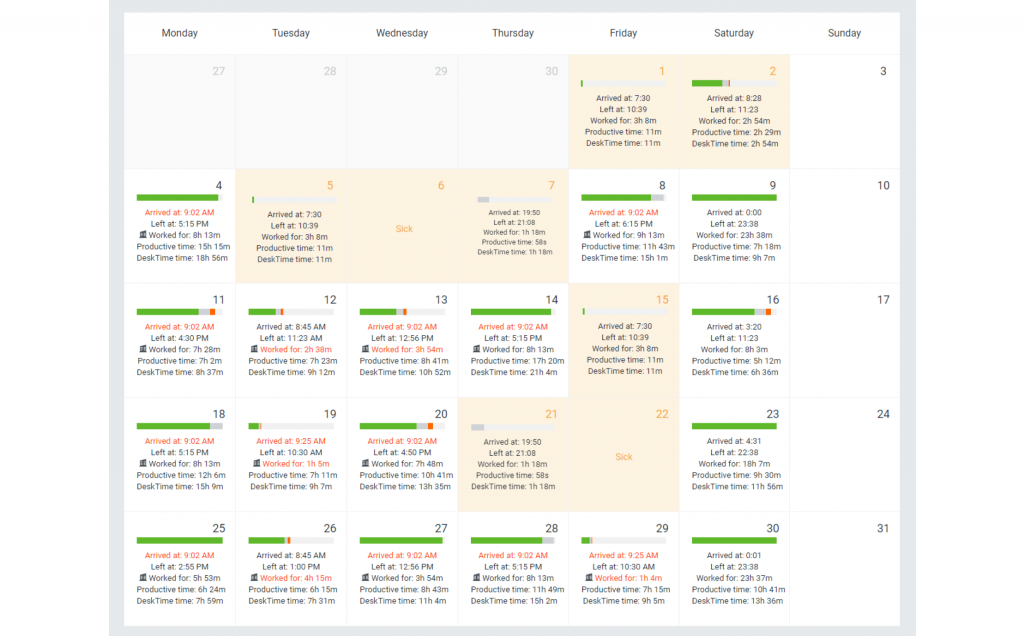
Where to find it: Go to My DeskTime and click “Month” at the top right corner.
8. The difference between “Productivity” and “Effectiveness”
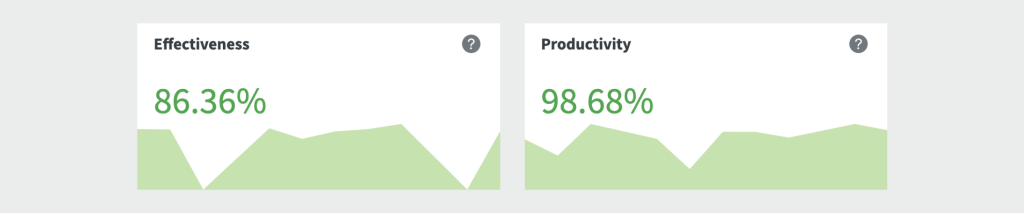
This is so commonly misunderstood. So once and for all, the difference is that productivity refers to your computer use, while effectiveness refers to how much you get done during work hours.
- “Productivity” refers to the amount of time you’ve spent at the computer that has been productive (aka how much computer time you spend using productive applications)
- “Effectiveness” is tied to your “minimum work hours” – how much time you spend during defined work hours that has been using productive applications. So, 8h minimum hours = 8h time spent on productive apps = 100% effectiveness. If you work more than your minimum hours, effectiveness is more than 100%,
So if I wanted to embody the “work smarter, not harder” principle, I would be looking at “Effectiveness” – how much productive time I can squeeze into set work hours.
Where to find it: See your productivity and effectiveness scores on your My DeskTime page.
Pro tip: read more about measuring efficiency here.
Want your business to thrive?
Boost your team’s productivity and efficiency ratings with time tracking!
Admin tips & tricks
1. Set ”tracking starts” and ”tracking ends” time 1-2 hours before official office hours
Say your team works a typical 9-5 schedule. When you’re setting up your account, you would think that you would set your “tracking starts” for 9:00, and your “tracking ends” time for 5:00, right?
There’s a better way. Here’s why:
Very rarely do people arrive at their computers at 9:00 on the dot and very rarely do they leave at 5:00. Some people get a head start, while others occasionally stay longer to finish up a project.
To accommodate for employees that might want or need flexibility, set your “tracking starts” and “tracking ends” a few hours before and after the workday ends. That way, you make sure that no hard-working employees go unnoticed.
Where to find it? Go to your DeskTime account and go to Settings -> Account -> Tracking days, and set your start and end times.
2. Set Default hourly rate for easy project-based bookkeeping
You can set an hourly rate for all employees across your organization so that when you export a project report, the value of time spent on the projects is automatically calculated.
This is particularly helpful for agencies that bill by the hour. So, if you have multiple employees who work on “Client X” projects, then you’ll see the total amount of time spent on project “Client X”, as well as how much they owe based on the hourly rate.

Where to find it: Go to your DeskTime account and go to Settings -> Account -> Geo, and set the Default hourly rate. Then go to Exports -> Projects -> Previous month -> Select team -> Monthly -> Create export for a monthly overview of projects and their costs.
3. Blur auto screenshots for balanced privacy
Though time tracking with screenshots isn’t every manager’s cup of tea, believe it or not, there’s a lot of demand for this feature.
But to balance it out, there’s an opportunity to blur the contents of the screenshot in order to protect the details, but get the bigger picture.
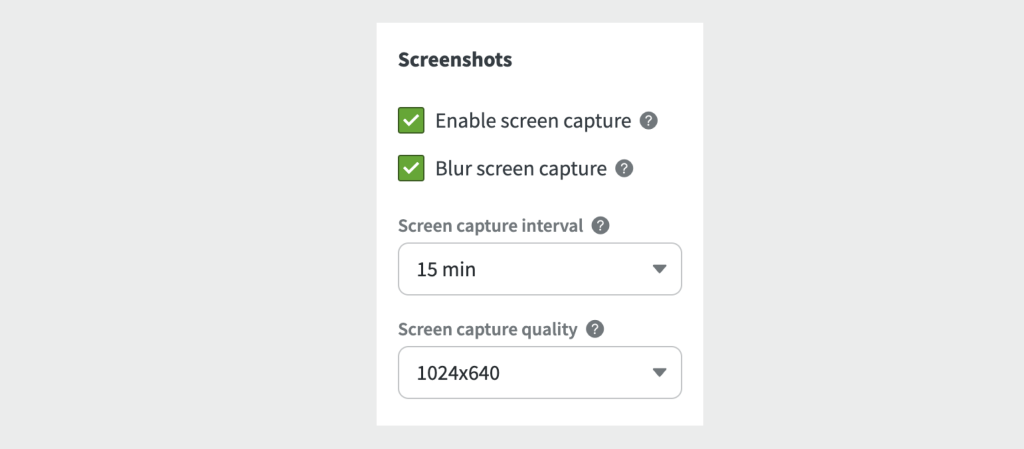
Where to find it: Go to your DeskTime account, Settings -> Account -> Screenshots -> Blur screen capture
4. Download screenshots
For those organizations that use screenshots, it might be interesting to know that they can also be individually downloaded and saved for future reference.
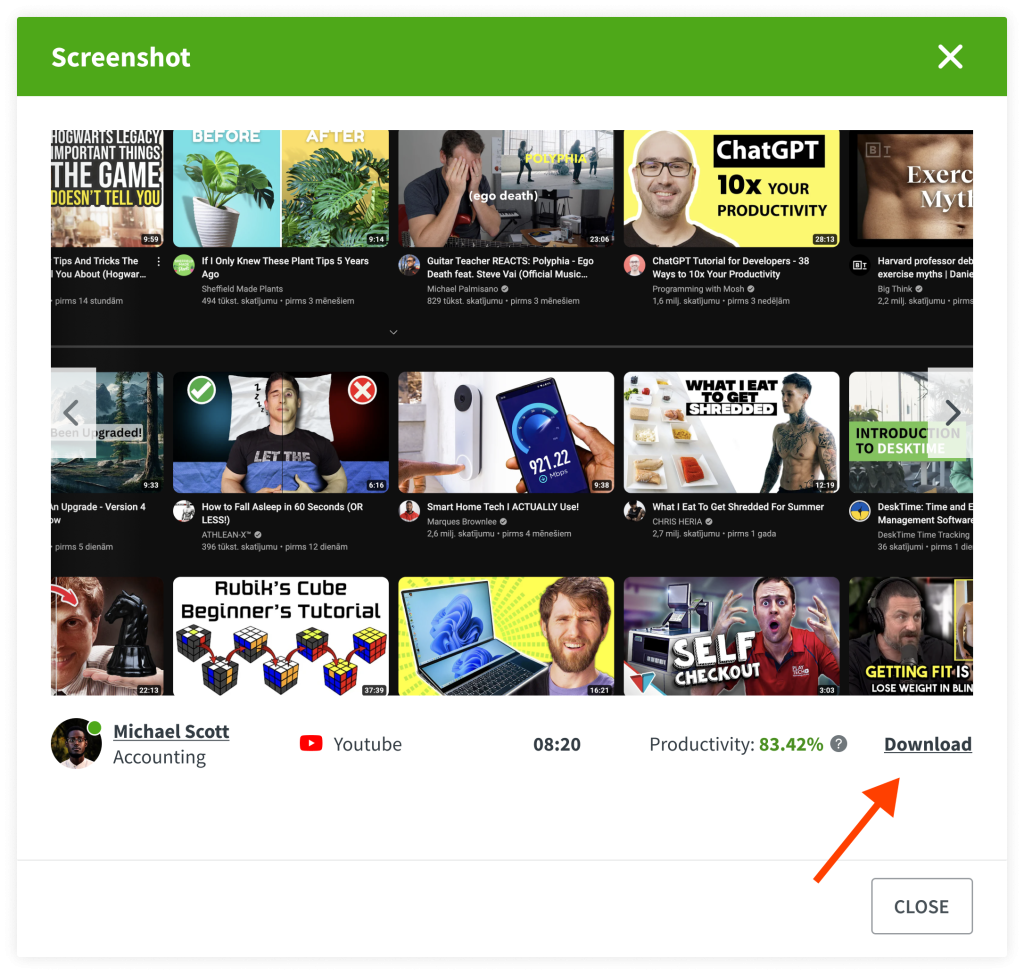
Where to find it: Go to your DeskTime account -> Screenshots -> Click on the specific screenshot -> Click the download icon at the bottom of the popup
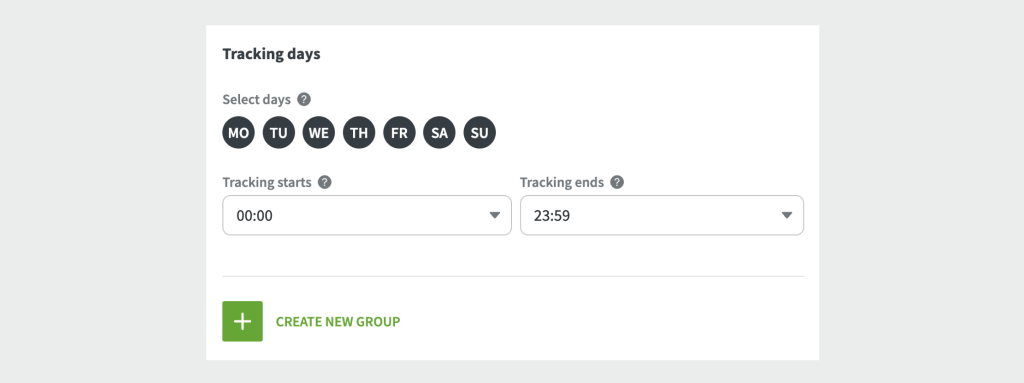
5. Set custom workday hours (ex. Shorter Fridays!)
If you have an organization-wide custom workday length (for example half-day Fridays during the summer) – then you can add those in your accounts section to ensure that those expectations are reflected, and employees aren’t penalized for working less than 8 hours.
You can select which days have which times, and build a customizable work schedule for your entire business.

Where to find it: Go to your DeskTime account, then Settings -> Account -> Working days -> Create new group -> Save
6. Save Work Schedule templates for faster shift scheduling
If you have several set shifts – like morning shifts, or shifts for specific days of the week – you can build those shifts and turn them into a template.
That way, the next time you assign an employee to a shift, you don’t have to manually build it each time.
Simply create your shift template, give it a name, set which days it repeats, and save.
Simple as that!

Where to find it: Go to your DeskTime account -> Work Schedules -> Add schedule -> [Fill in the details] -> Check “Save as template” -> Save
7. Make all new apps “productive” by default
Defining each new app’s productivity category can be time-consuming and tedious. Especially for teams that regularly conduct research and, as result, tend to visit many new webpages throughout their research.
To avoid having to go through each app to set its productivity category individually, you can batch-assign a productivity category to all new incoming apps.
Where to find it: Go to your DeskTime account, go to Settings -> Account -> Tracking -> Default application productivity
Did you find this article useful? Give it a clap!
Psst! You can clap more than once if you really loved it 🙂