14 Jira tips and tricks for a more efficient workflow
Whether you’ve been using the Jira project management tool for a while or have just started to use it, this Jira tips and tricks article is for you. Developed and owned by Atlassian, this powerful tool for agile development teams can be a great help with project management.
We’ve compiled 14 Jira tips and tricks that will teach you how to use Jira effectively to manage your software development projects with ease. We’ve divided them into three sections – Jira tips and tricks for project managers, some essential Jira tips for beginners, and best practices for combining Jira with time tracking. So, let’s dig in, shall we?
You’re also welcome to jump to the section that’s most relevant to you:
Want to get the most out of your time?
Try DeskTime for free!
Try free for 14 days · No credit card required.
By signing up, you agree to our terms and privacy policy.
Jira tips for beginners
Whether you’re a project manager who’s all new to Jira or a member of a team that has recently adopted the project management tool, this section of hacks is for you – let’s explore a few Jira tips for beginners.
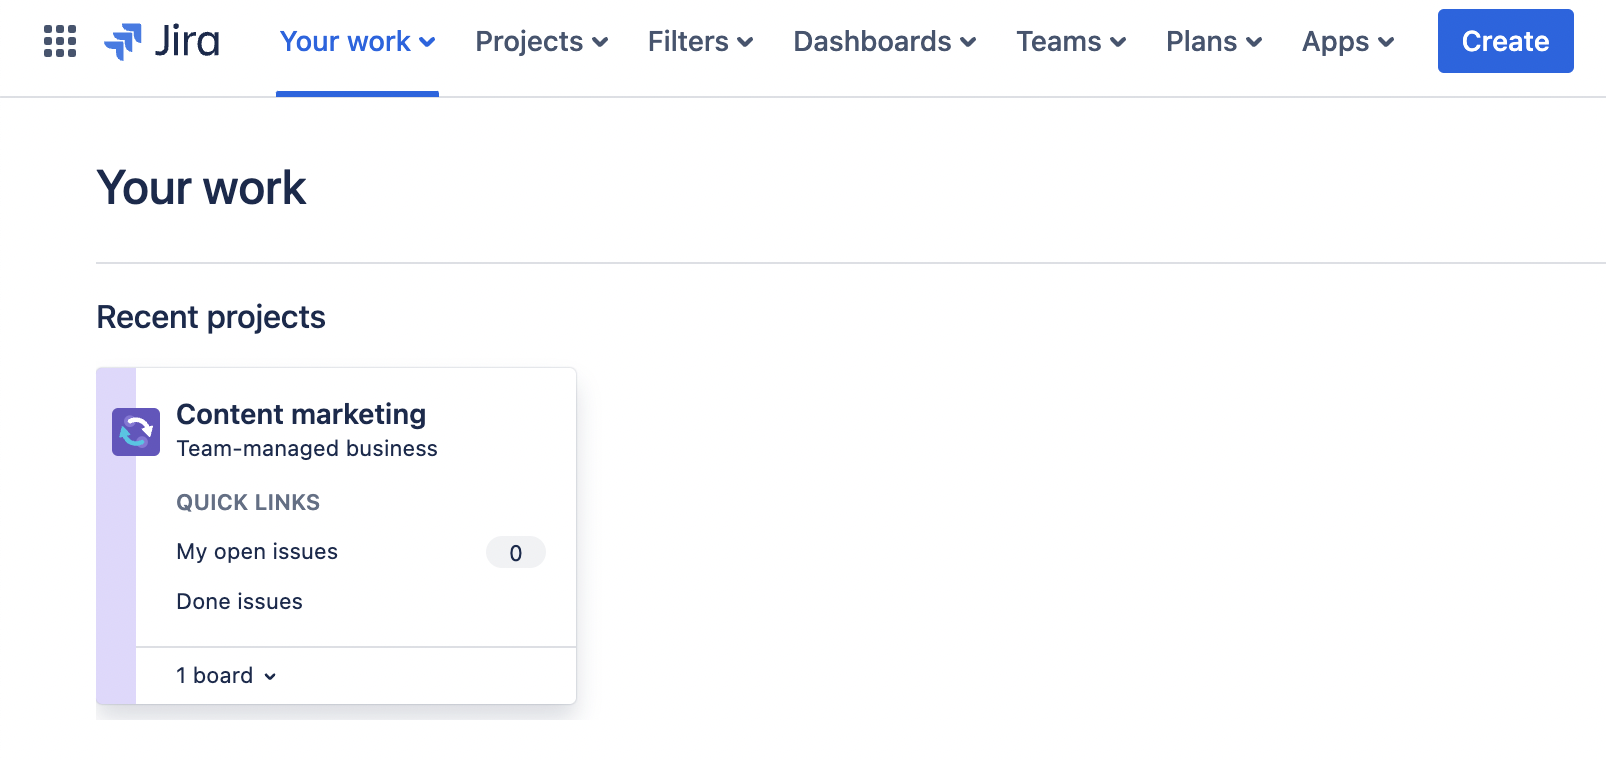
Become familiar with the Jira interface
The number one of Jira tips for beginners is to familiarize yourself with the Jira interface. It’s designed to streamline your workflow and provide easy access to vital information. Hence, you can learn it by reviewing sections to see what they contain. Familiarize yourself with the various screens and features to navigate efficiently. The dashboard, for instance, offers a comprehensive overview of your projects and tasks, helping you stay organized and informed.
Operate with Jira issues wisely
The main ingredients for any project on Jira are called issues – think of them as parcels that carry your work around the tool. Thus, wisely operating with issues can boost your workflow efficiency and add clarity to your to-do lists.
Jira offers several types of issues, each representing something different:
- Task – a work that needs to be done
- Bug – a problem that needs to be fixed
- Story – smallest unit of work that needs to be done
There are also subtasks (or the so-called child issues) that can be added to the issues on Jira to split your work into smaller chunks. You can add a description, attach files, and more to each subtask, the same as Jira issues.
Using this Jira issues’ hierarchy is a good idea for adding more clarity to your workflow. Use standard issues (tasks, bugs, or stories) to represent regular tasks and add child issues to split the issues into smaller parts.
Get the best out of Jira dashboard gadgets
Jira dashboards are great for bringing an overview of your progress whenever needed.
As you begin using Jira, you have a default dashboard set up. In it, you’ll find the issues assigned to you, what projects you’re part of, and more. You can reorder and configure the default dashboard gadgets and change the dashboard layout according to your preferences.
You can also create your dashboard on Jira, containing the necessary information without any unnecessary items. When building it, you can add various gadgets that will populate your dashboard with the information you want to see:
- Activity Stream Gadget – shows a summary of the user’s recent actions
- Average Age Gadget – shows a bar chart with the average number of days a user left the Jira tasks unresolved
- Quick Links Gadget – shows all the useful links within Jira that the tool associates with the user
- And many more
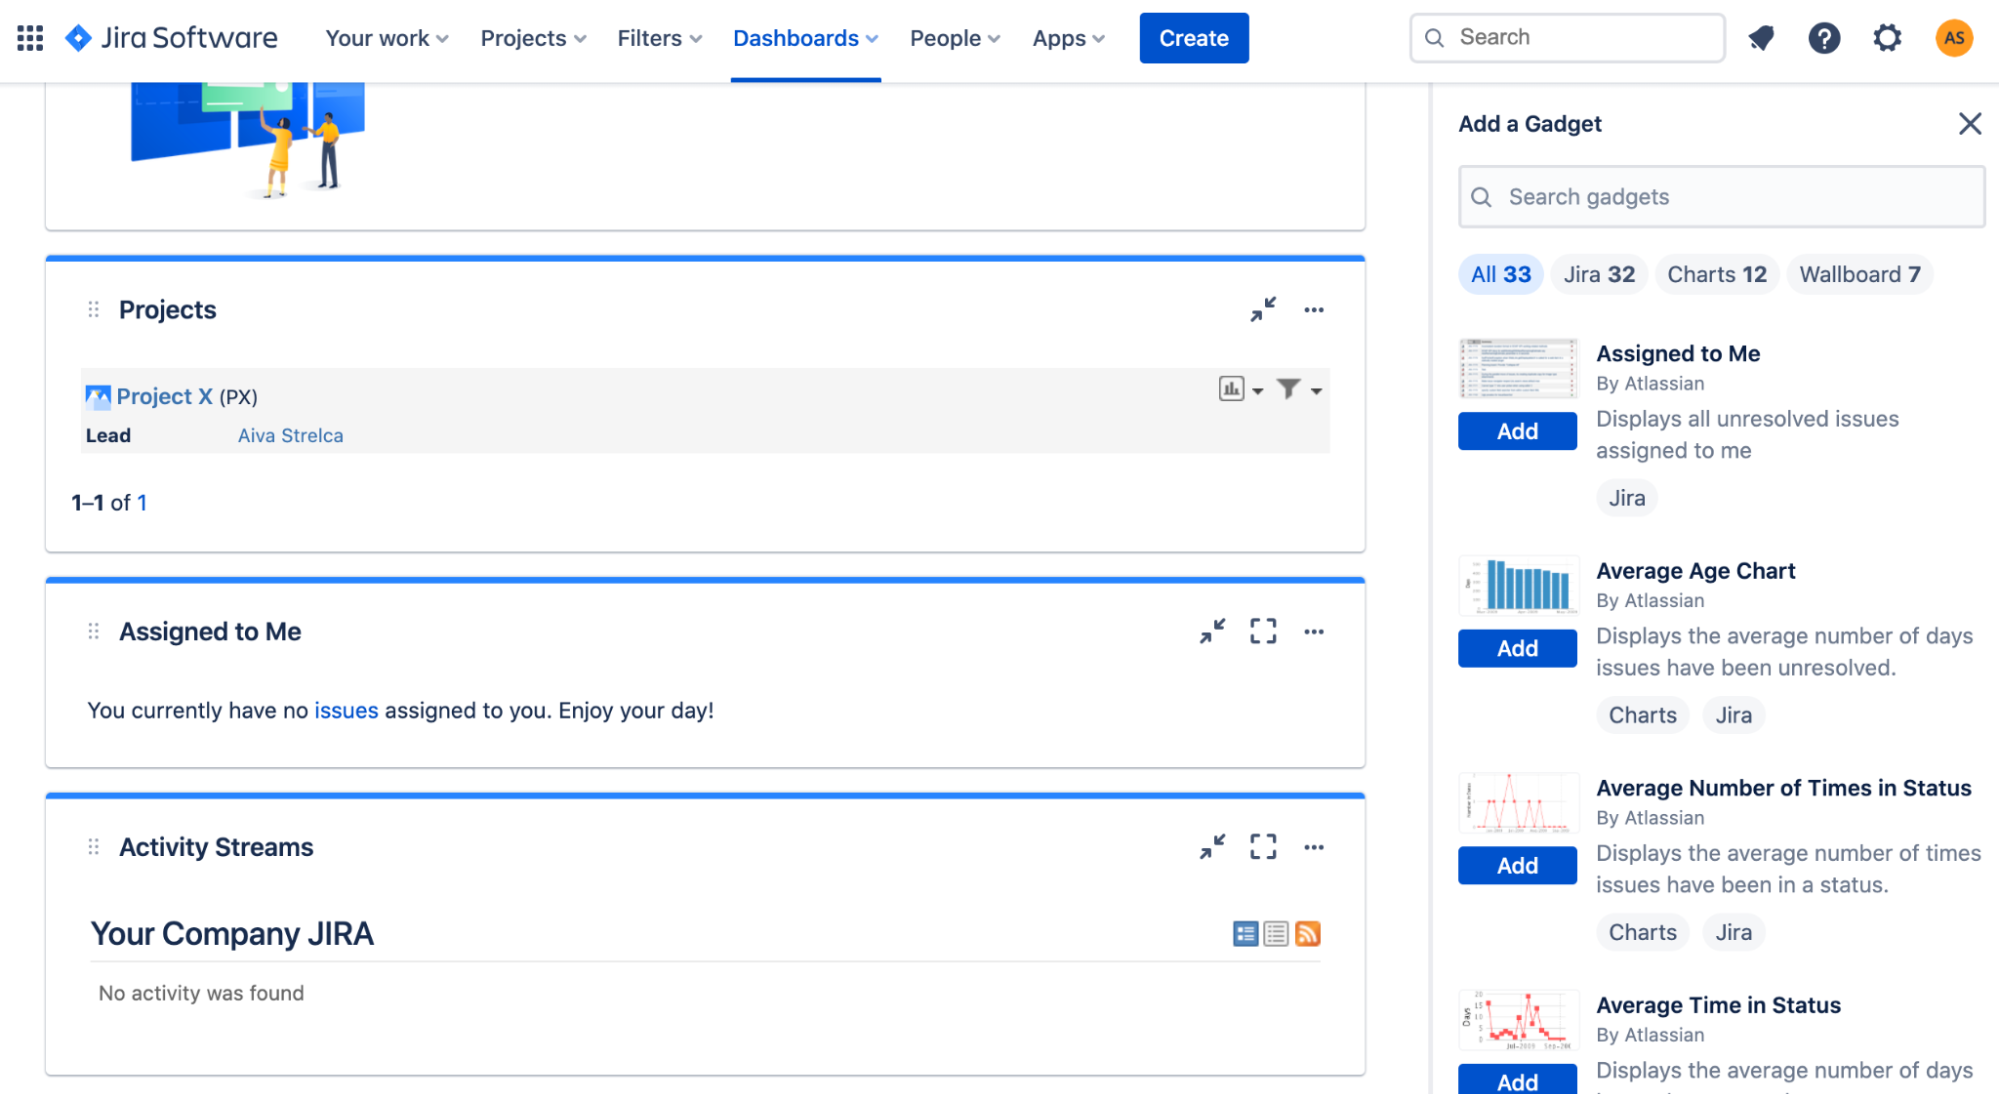
To edit your Jira dashboard, click Dashboard on the top of your Jira view and choose whether you want to work within the default dashboard or create a new one. Adding gadgets is also easy to find – when you’ve opened the dashboard, click the Add gadgets button in the top right corner and choose from your options.
Use keyboard shortcuts
Keyboard shortcuts are great for speeding up your work on any tool, including Jira. So, if you’re a Jira beginner, using this Jira tip for shortcuts is a great skill to learn early on, as it will save you a lot of time in the long run.
Less talking, more shortcutting. Here are some helpful keyboard combos you’ll be happy to know:
| Keyboard | Action |
| Mouse hovered over an issue + o (or) Enter | Open the selected issue |
| Mouse hovered over an issue + a | Assign the selected issue to someone else |
| Mouse hovered over an issue + i | Assign the issue to yourself |
| Mouse hovered over an issue + m | Add a comment to the issue |
| Mouse hovered over an issue + l | Edit issue labels |
| c | Create a new issue |
| / | Quick search |
| Shift + / | Open the list of all Jira keyboard shortcuts |
Use Jira labels
Another useful Jira hack is incorporating Jira labels into your workflow. Labels are a versatile tool for organizing and categorizing issues. By applying relevant labels to your Jira tasks, you can quickly filter and search for specific items, making it easier to manage your workload and track progress.
For instance, you could use Jira labels to indicate priority levels, project phases, or your assignments. This helps ensure that issues are addressed efficiently and that you stay aligned on your work goals.
Custom fields – a must-do Jira tip for beginners
Another Jira tip for beginners is to use custom fields to add necessary information to the tasks and projects you’re working on. Think of Jira custom fields as extra boxes you can add to your to-do list. Instead of just writing down the task, you can add details like when it’s due, who’s doing it, or how important it is. This makes it easier to find and organize your tasks.
For example, you might add a box for “priority” to quickly see which tasks are most urgent. Or you could add a box for “project” to group tasks together. This helps you stay organized and keep track of everything you need to do.
How does this Jira tip work:
To add a new custom field, go to your Jira project settings (a cogwheel icon and a “Project settings” on the right side of your project name). Then, in the left-hand sidebar, click “Issue types”, and on the right side, you’ll see a section for fields. On the bottom of the section, select “Go to custom fields”.
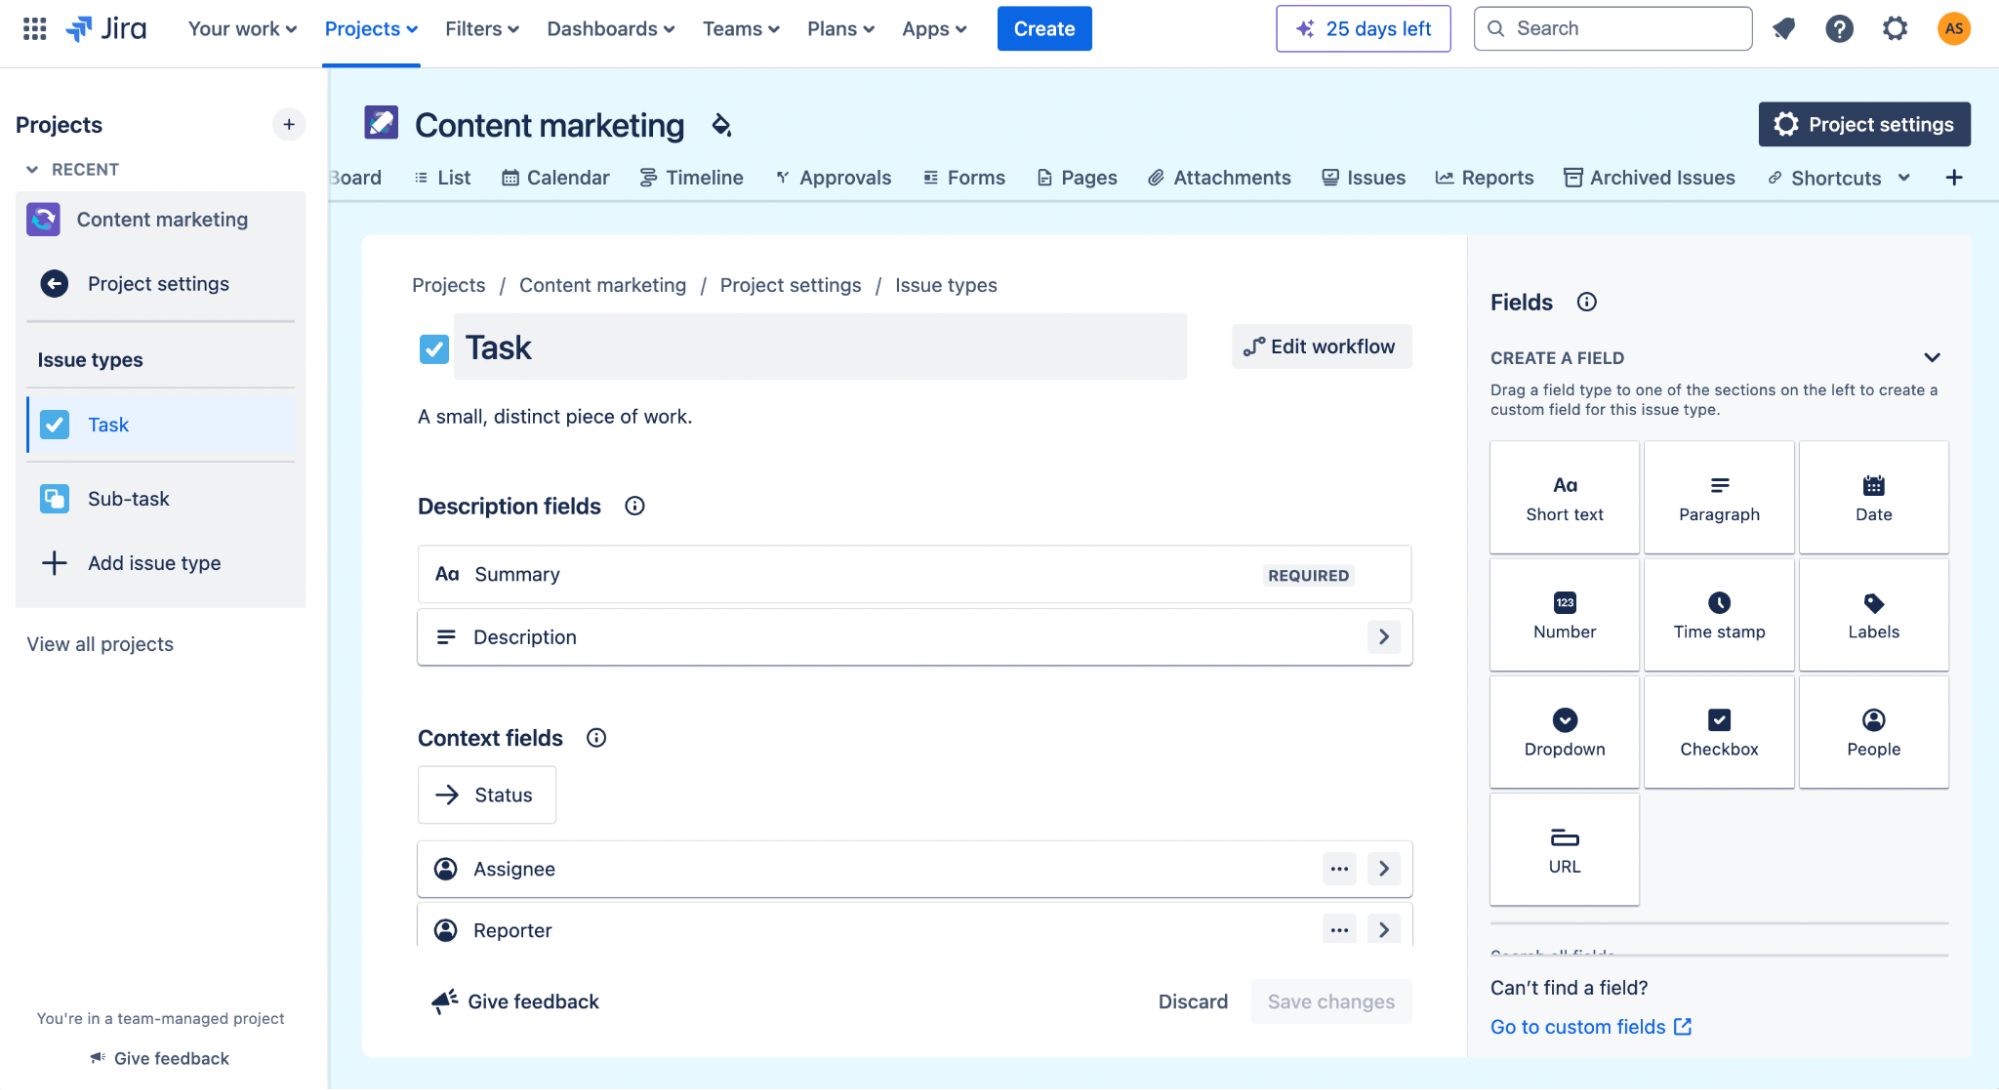
Now, you’ll see a dialog allowing you to create new custom fields or edit existing ones.

Jira hacks for project managers
Jira is well-known for its ability to adapt to different workflow needs, which is incredibly convenient in project management. Being a project manager is quite a tough job, and without a helpful set of tools, it can get hectic.
Jira is tool that can help project managers avoid many pains. And to make this experience even more pleasant for you, dear project manager, here are five Jira hacks you’ll be happy to know!
Task automation with rules
In project management, there can be many administrative tasks stealing away your precious time. If you often think that “there HAS to be a way I can automate these things” this Jira tip on automated tasks is what you need.
Jira offers automation – a no-code rule builder, which establishes rules based on if-this-then-that principles. You don’t need to know how to code to set a rule, BUT you’ll be able to create automation rules only if you’re a global or project admin on Jira. Depending on which type of admin you are, you’ll find Jira automation on your menu under sections Automation Rules (for global admins) or Project Automation (project admins).
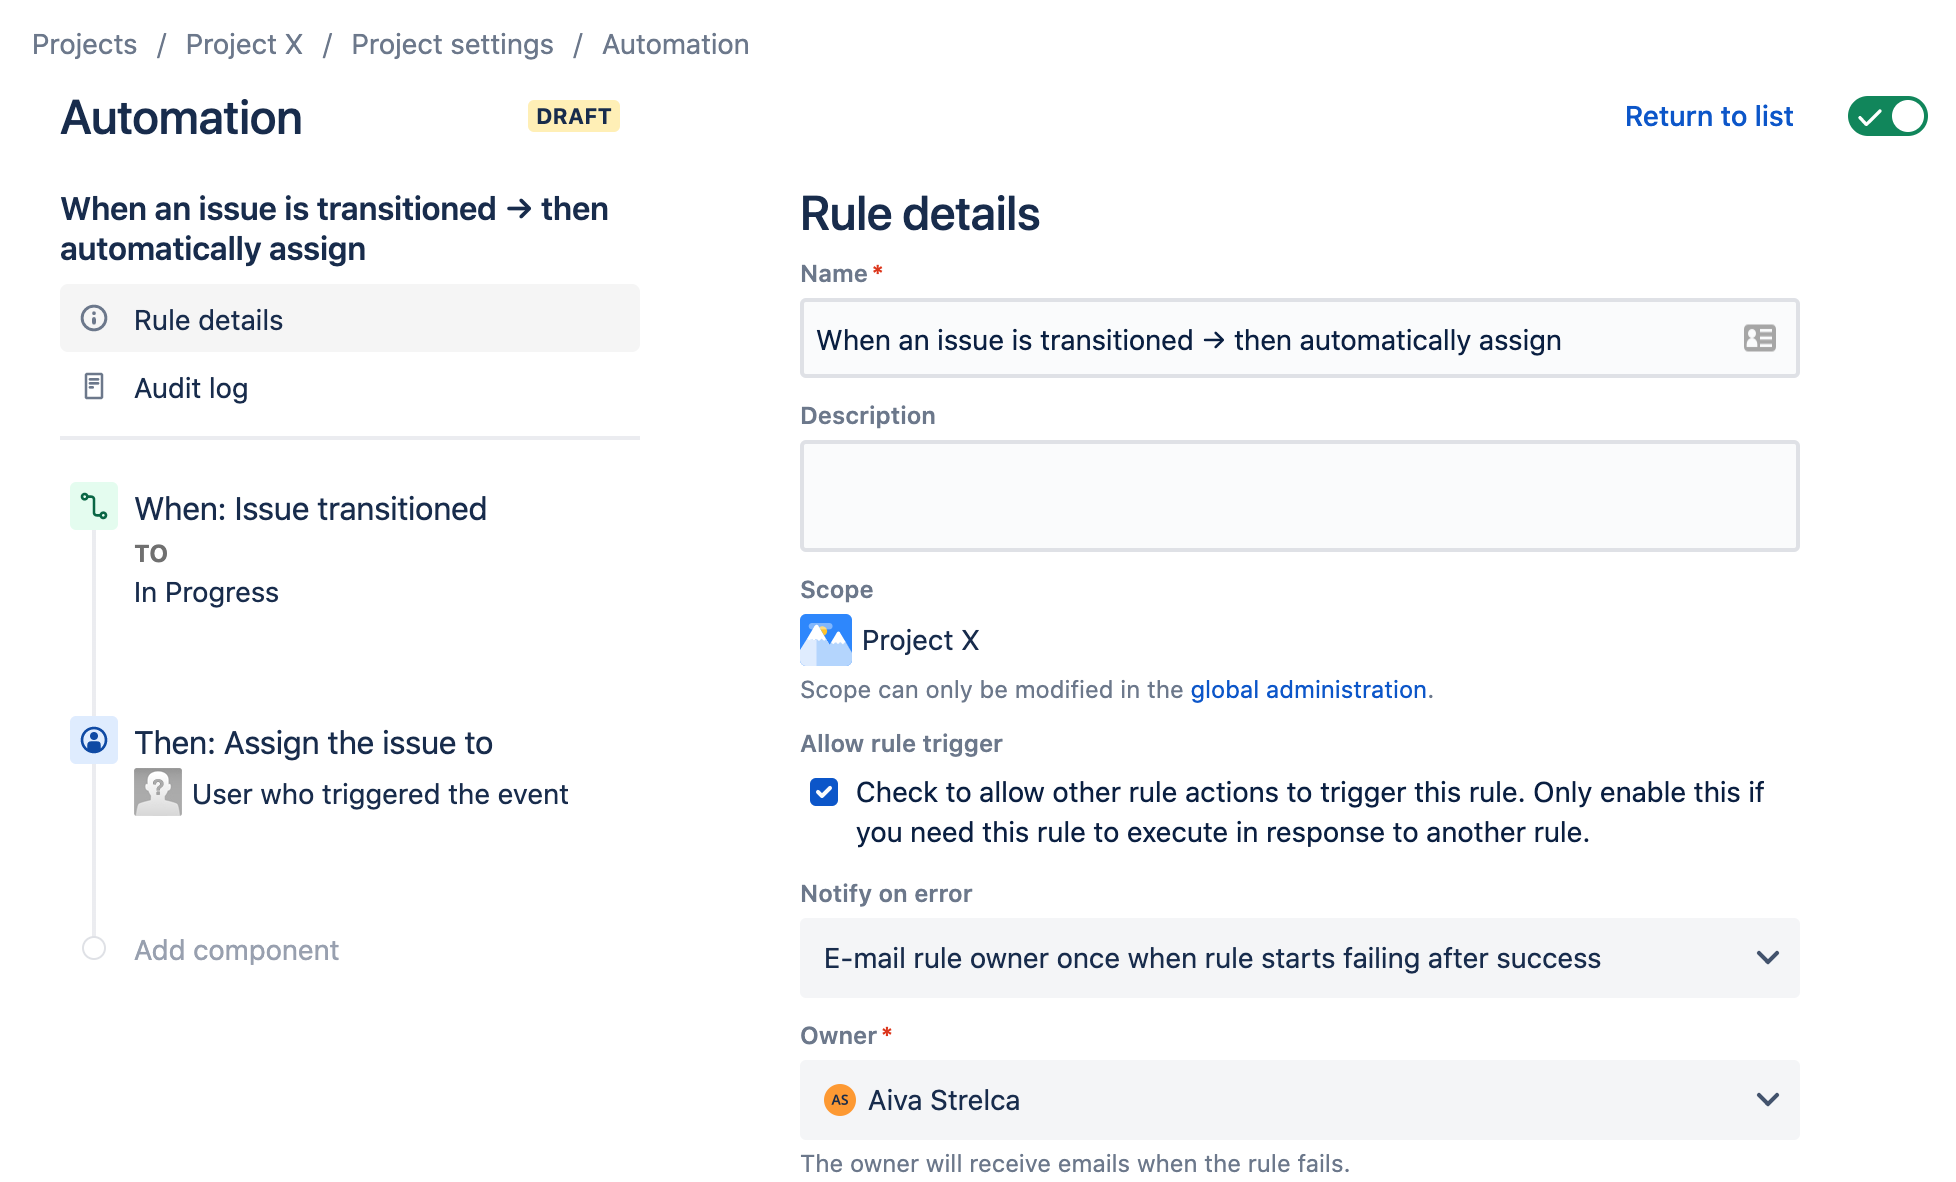
How does this Jira tip work?
By setting up rules, you can automate actions according to the criteria you’ve set. There are three components to this – a trigger that initiates the rule, if-this-then-that conditions that clarify the rule, and the resulting actions. By defining and combining these components, you’re able to create a variety of automated rules that can perform different tasks without needing your manual effort.
Prioritizing Jira issues
One of the most important conditions for productive work is the ability to prioritize assignments. The same goes for managing project tasks on Jira – it makes all the difference if you and your project team have established a clear order on prioritizing your work. If you haven’t yet, the Jira project management tool can help with that.
Jira offers a default set of priorities for tasks you can adapt to your needs. You can add a particular priority to any Jira issue type (task, bug, story, and more) so that your team knows which assignments to tackle first. The default priorities system on Jira has five levels – highest, high, medium, low, lowest – and each of them has a default meaning, described by Jira.
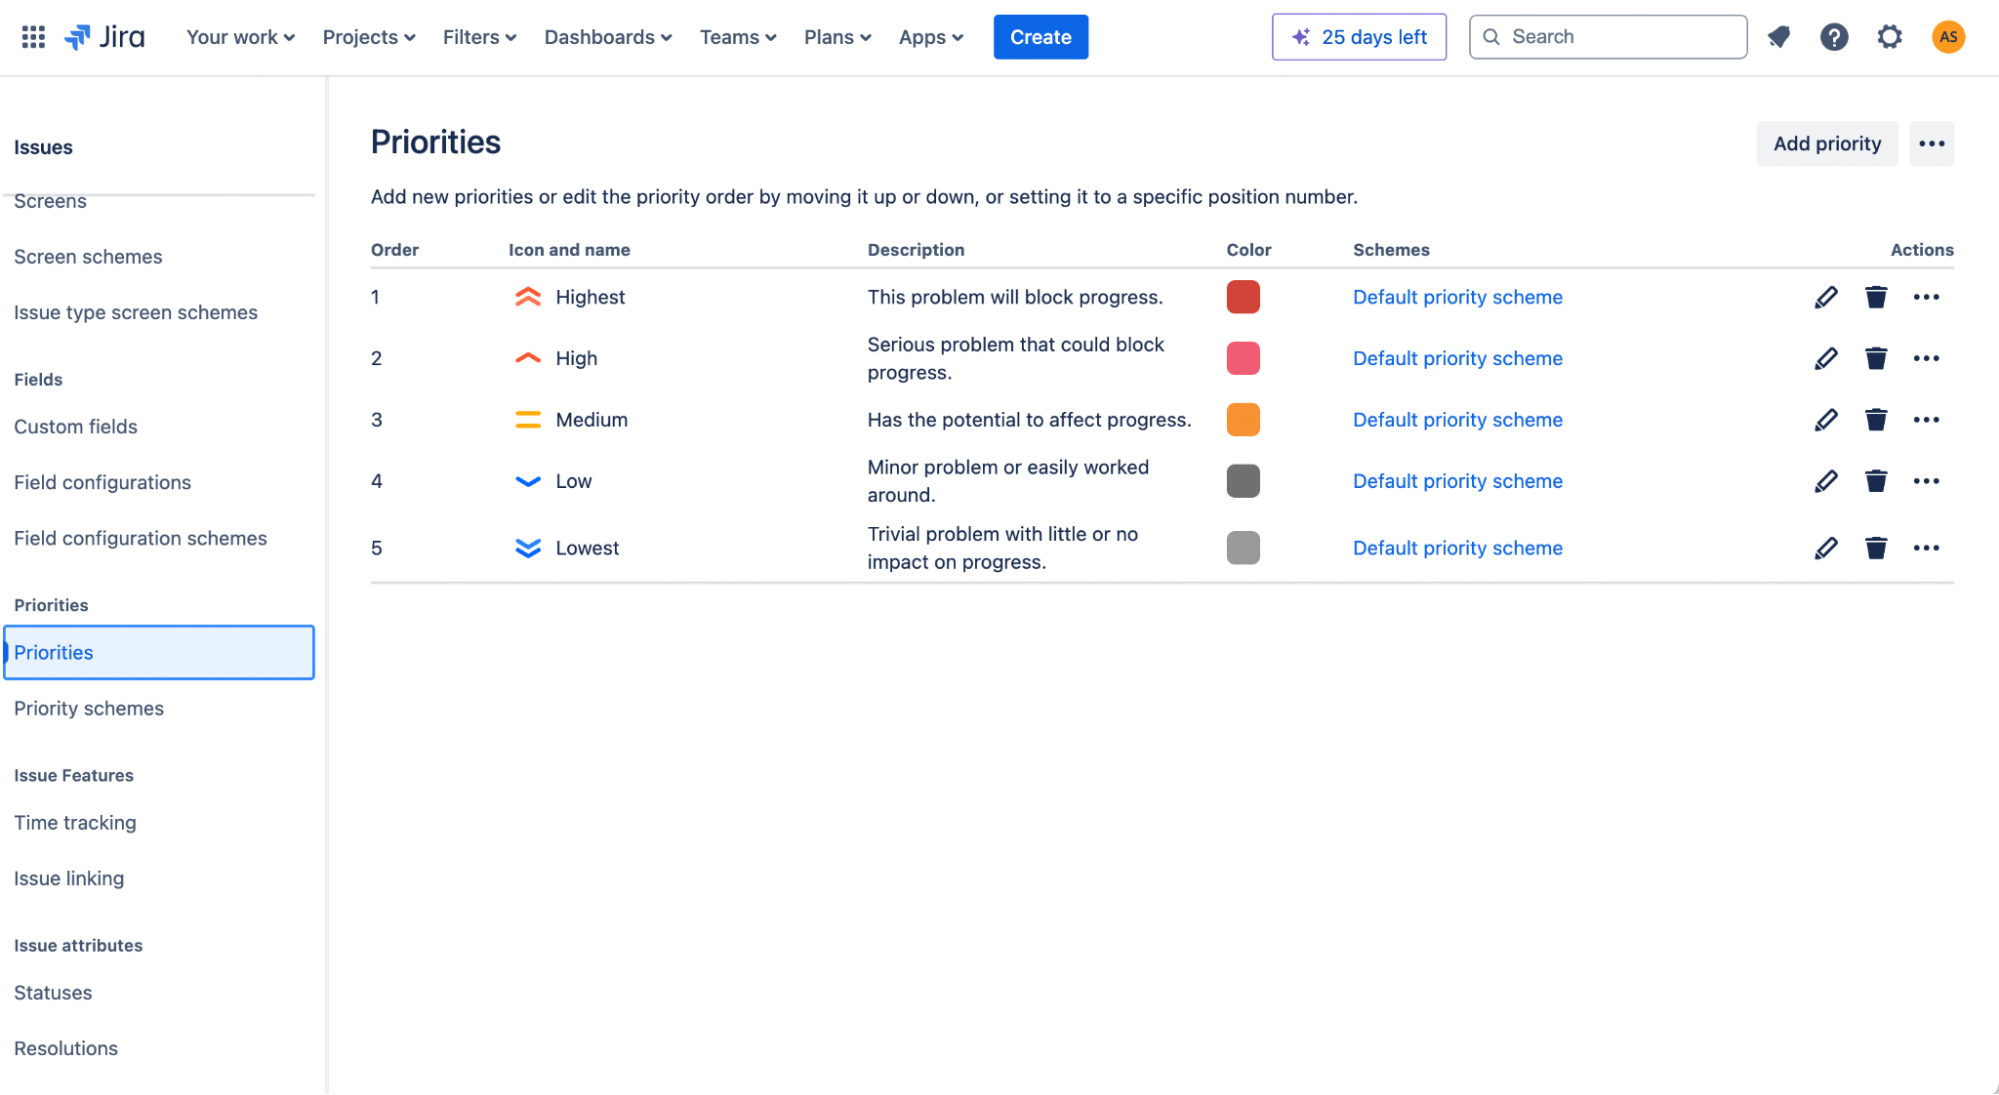
You can either use the default Jira priorities system or edit it according to your specific needs. Moreover, you can also create different priorities for different projects if a specific evaluation is needed. To access the priorities section on Jira, click the Settings icon on your top right corner and choose Issues. Then scroll down through the sidebar on your left and click Priorities – voilà, you’re there!
Note: Similar to the previous Jira hack, configuring priorities is accessible to Jira admins.
Task prioritization on Jira
While Jira can be a powerful tool for managing your tasks and projects, sometimes, it can feel overwhelming with so many things to do. That’s where task prioritization comes in. It’s like sorting your laundry into piles – you do the most important things first.
There are several ways to prioritize tasks on Jira. But here are some of the most common that you could give a try as well:
- Use labels – you could add labels like “urgent,” “important,” or “low priority.” This helps you quickly see which tasks need your attention
- Set deadlines – give each task a deadline. This will help you understand how urgent it is.
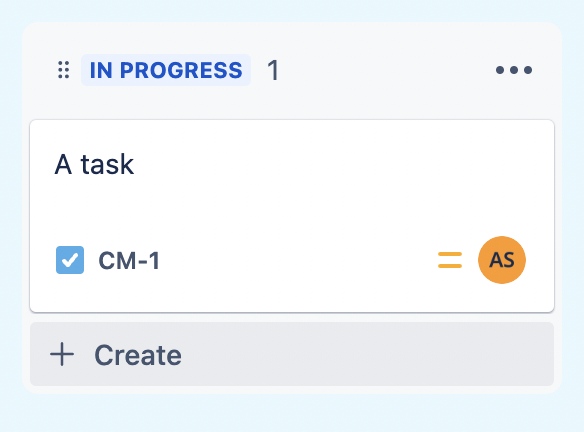
- Create a Kanban board – a Kanban board is a visual way to organize your tasks into different stages (like “To Do,” “In Progress,” and “Done”). This can help you see which tasks are most important and where they are
- Use the “Estimate” field – if your tasks involve much work, you can use the “Estimate” field to estimate how long each task will take
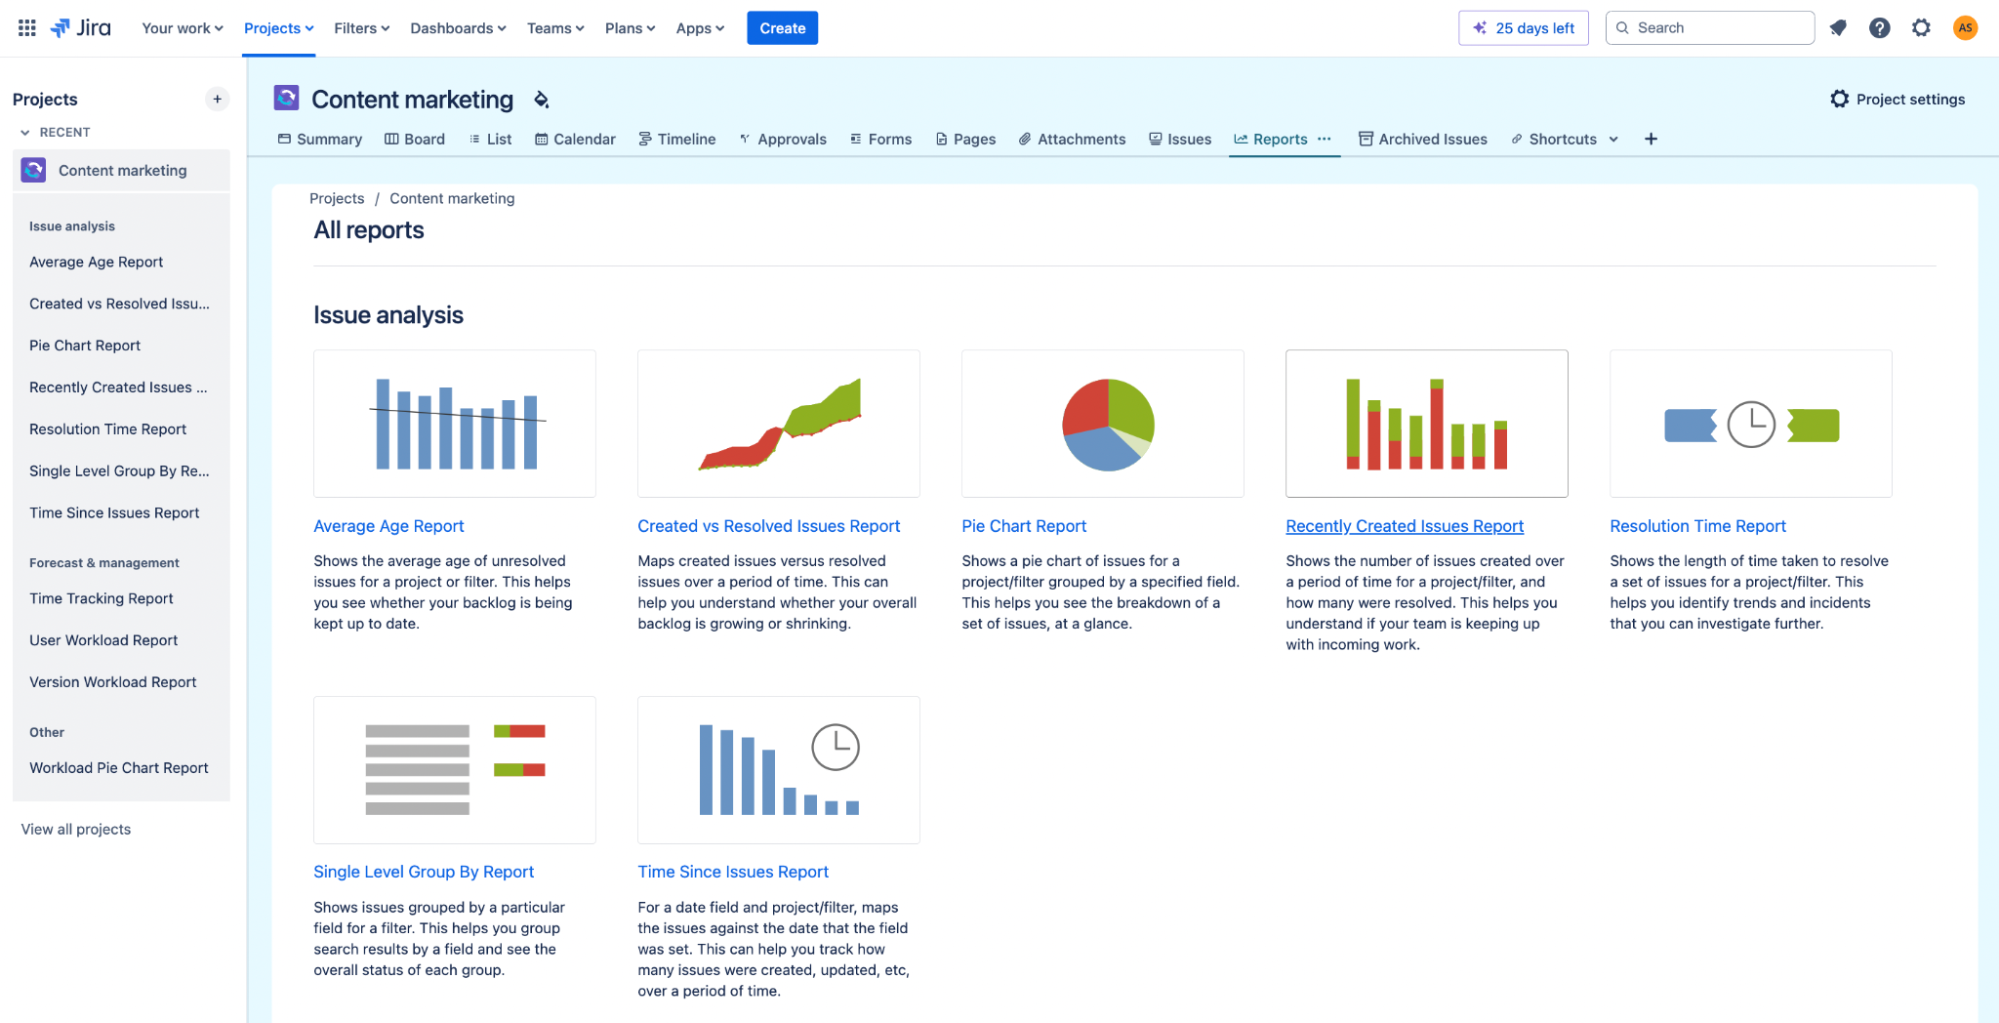
Reports for enhanced clarity
Reports are always an essential part of project management. Weekly, mid-term, final – having a comprehensive overview of project status is crucial to see if the project is going how it’s supposed to. Therefore, we simply couldn’t overlook what Jira offers in project reports, as part of our Jira tips and tricks for project managers.
Jira offers a variety of different report types. Depending on what kind of team you manage, chances are you’ll find the exact report option you need. Jira reports include:
- Sprint reports – how the work is going within specific work sprints
- Burndown charts – how much work has been already done and how much remains
- Velocity chart – the amount of value delivered over a particular period of work
- And other report types – created vs. resolved issues, pie chart, time since issues created, etc.
It’s up to you to choose which report type suits your project needs best. We suggest exploring several options to find the best Jira report fit.
How do I generate a report on Jira?
- Navigate to the “Reports” section – this is typically located in the project settings or a dedicated “Reports” tab
- Select the desired report type – choose the report that best aligns with your reporting needs
- Configure the report (if necessary) – some reports may require you to specify filters, date ranges, or other parameters
- Generate the report – click the “Generate” or “Run” button to create the report
Make the most out of third-party integrations
Jira is an excellent tool for managing your projects and tasks, but it can be even more powerful when you integrate it with other tools you’re already using. Hence, here’s another valuable Jira tip for you – use third-party integrations
Third-party integrations allow you to connect Jira with other applications, like:
- Messaging apps – Slack, Microsoft Teams
- Project management tools – Asana, Trello
- Time tracking apps – DeskTime, Toggle, Tempo Timesheets
- Code repositories – GitHub, Bitbucket
However, there are so many more third-party apps that can be integrated with Jira to make your work life easier. To discover them all, go to the Atlassian Marketplace and look for what you need.
Jira time tracking best practices
When delivering a project, it’s crucial to have precise data on time spent on particular tasks and the number of billable hours. It helps with accountability both in front of your clients and within your project team. Time tracking tools are perfect to deliver such data. So, let’s look into some of the best time tracking practices for the Jira project management tool.
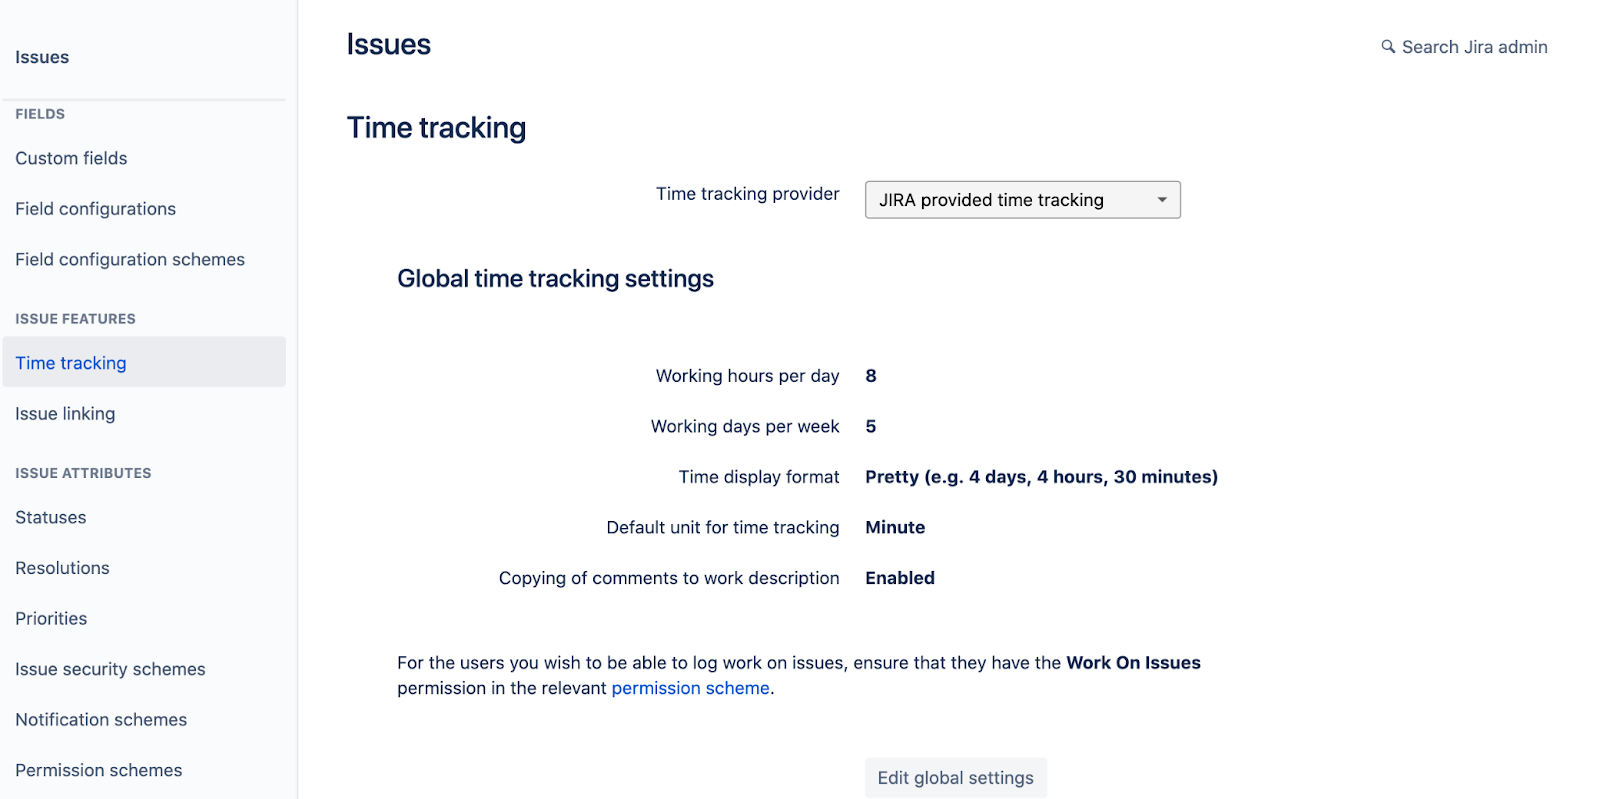
Jira in-built time tracking
Time tracking on Jira is enabled by default. In Settings, you can disable and re-enable the tracking, grant time tracking permissions to your team, and choose which users’ time you’ll track with Jira’s in-built feature.
You can also adjust such Jira in-built time tracking settings as the default number of working hours a day or working days per week – convenient if your team, for example, has any part-time workers or you’ve all adjusted to a 4-day working week.
Additionally, you can change the time tracker itself. If you use other time tracking software to track work hours, you may want to integrate it with Jira, so you don’t have to gather data from two different time tracking tools. To switch to another time tracker, select Issues in Settings, then find Time Tracking in the Issues sidebar on the left side, and you’re good to enable changes.
Integrating Jira with DeskTime time tracking
If you’re a DeskTime user that manages their workflow within Jira or if you’re thinking about a third-party time tracking tool to use, DeskTime has a Jira integration. Project management in Jira combined with DeskTime’s time tracking features can significantly boost work productivity and add clarity to your team’s workflow.
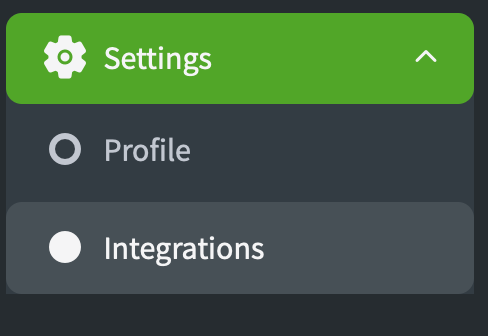
Establishing a connection is relatively easy – but first, make sure you are registered both as a Jira and DeskTime user. When that’s done, open your DeskTime app and go to Dashboard. Then select Settings and Integrations on the sidebar. Find Jira integration and hit the Activate button.
Then as a pop-up window appears, you’ll have to provide the needed details to allow DeskTime to access your Jira account.
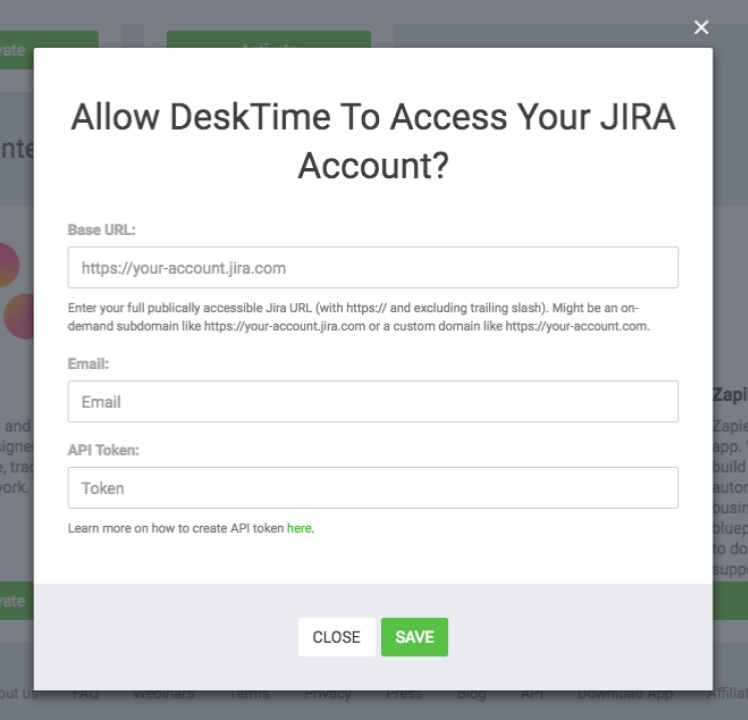
Note: To create or copy your API Token, go here.
Then as you connect Jira to DeskTime, all of your projects will be sent to DeskTime’s app. And you’ll be able to find them in your Projects section on DeskTime’s Dashboard.

Looking for a time tracking tool that can be paired with Jira?
Give DeskTime a shot!
Keep your finger on the budget pulse
If you track your Jira time with a third-party time tracking software, chances are it offers features for project cost calculation, billing, and more. This can be very helpful for keeping track of project expenses as well as accurately billing your clients.
DeskTime allows you to fill in hourly rates for each team member to calculate the costs of a project as precisely as possible – the time tracking tool automatically does the calculation.
Conclusion on Jira tips and tricks
The Jira project management tool is full of great gems that can benefit everyone’s workflow, whether you’re a project manager or team member. While getting used to working with Jira can take some time due to its many features, the helpful Jira tips and tricks explored above will certainly help you adjust faster.
We genuinely hope that these Jira hacks will help you achieve more efficiency in your work. If you’ve got any cool Jira tips and tricks up your sleeve, feel free to comment below – the more awesome hacks, the better!
Did you find this article useful? Give it a clap!
Psst! You can clap more than once if you really loved it 🙂