DeskTime for desktops vs DeskTime for mobile phones – what’s the difference?
As some of our readers may already know, DeskTime has two versions: a desktop version and a mobile version.
While both of the versions share the same set of core features that make them DeskTime, they have some major differences in their functionality, making one more suitable than the other in certain instances.
In this blog article, we’ll cover the main features of each version, for whom it’s for, and how to use the aforementioned features. So, by the end of this article, you’ll be able to make an informed decision on which to use based on your profession and the field of work that you’re in.
Want to get the most out of your time?
Try DeskTime for free!
Try free for 14 days · No credit card required.
By signing up, you agree to our terms and privacy policy.
DeskTime for desktops vs DeskTime for mobile phones: feature comparison
DeskTime’s mobile time tracking app is created as a “lighter” version of our desktop app. It means that while they do share some features, the desktop app has more of them, possessing greater functionality.
Let’s take a look at the features and functionalities available on both the desktop and mobile version and see how they differ.
1. Track your time with the time tracking function
With DeskTime you can track how you spend your time online, and that’s done with the feature called – you guessed it – time tracking.
The key difference between the desktop and mobile versions: when you use the desktop version, time tracking is fully automatic. It means that DeskTime automatically starts tracking time without the user’s interaction.
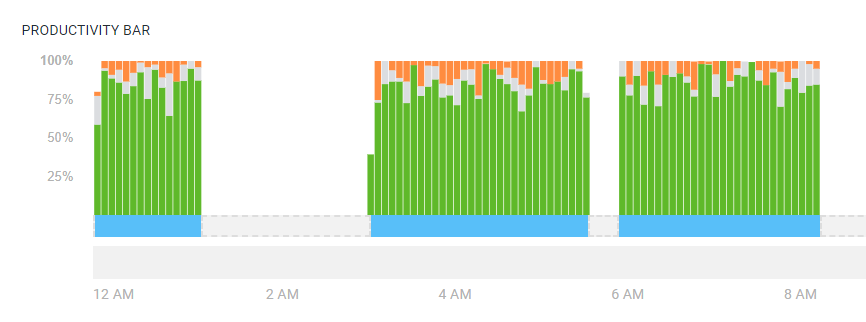
The way automatic time tracking works is that when a work computer is booted up or returns from being idle, DeskTime automatically starts tracking the activity without the user’s input. It then places the activity on what’s known as the productivity bar and classifies the time and activity by color, according to its pre-defined type:
- productive is green
- unproductive is red
- neutral is grey
Like so:
On the contrary, on the mobile version you have to start and stop the tracker manually:
- Open the app
- Tap the green play button at the bottom
- Indicate what you’ll be working on
- Indicate the status of this time you’re about to track (productive, unproductive, or neutral)
- Click “Start timer”
That’s it. Just don’t forget to stop the timer when you’re done!
2. Track individual projects with “Project tracking”
Project tracking is a feature for tracking time spent on certain projects and tasks. In other words, by using this feature, you can allocate your tracked time to a certain project you’ve been working on.
The project time tracker has to be started manually both on desktop and mobile version. Here’s how:
On the desktop version, time tracking starts with a click (right click if Windows) on the DeskTime icon in the taskbar and finishes with these steps:
- Select “Create a project / Search for a project”
- Either click the down arrow to find a project/task or type one in
- Start the timer
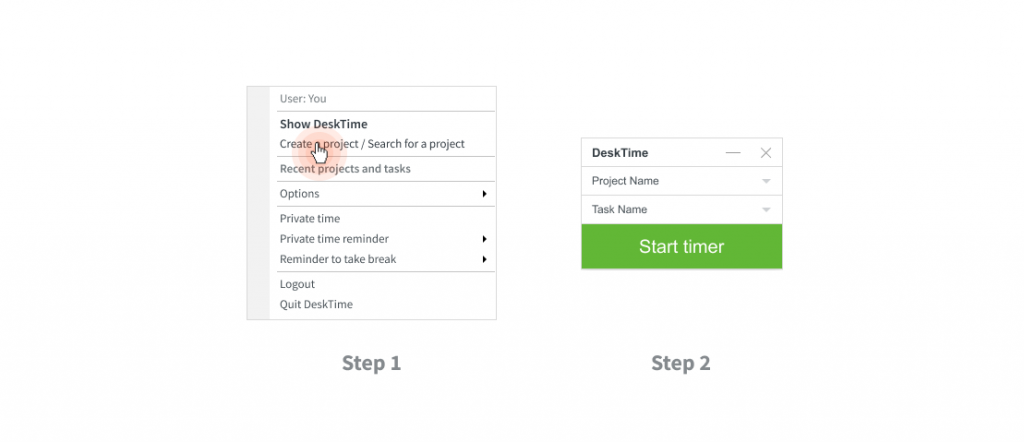
That’s all there is to it.
Later, when you’re ready to stop working on the project or task or want to switch to a different task and timer, you just click “Stop timer” and follow the same steps above.
Finally, it’s worth mentioning that the project timer is a floating widget that stays on top of other windows so that you don’t forget it’s there.
Note! The Project tracking feature can be used together with the Cost calculation feature (you can read more about it here). Hourly rates to calculate project costs can be set when creating a new project or for individual employees at any time under Settings – go to Team members → ⋮ → Edit.
When it comes to the mobile version, here are the steps you need to follow:
- Follow the first steps described in the previous section to start the time tracker
- Select a specific project from the drop-down menu or create a new one
- Tap “Start timer”
Note! If you create a new project on the mobile app, there’s an option to set up automatic cost calculation – simply enter your hourly rate. You can also enter your total estimated project costs and total time estimated to spend on the project.
Again, don’t forget to stop the timer when you’re finished or want to switch to another project.
Read more about DeskTime’s project tracking for mobile devices in this article.
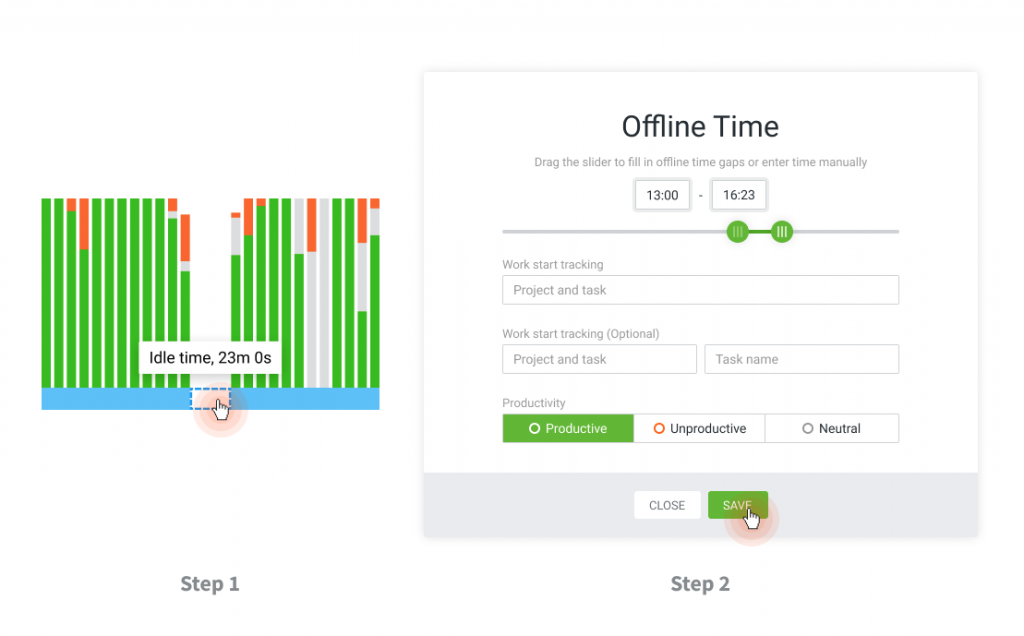
3. Track time spent away from the computer with “Offline time”
Sometimes being away from the computer does not mean it’s not work related. This is where the manual input for offline time comes in.
When you or your employees are away from their computers, this feature allows one to define the “idle time” as “offline time” and document it accurately.
Here’s how to input offline on the desktop version of DeskTime:
- In “My DeskTime,” find the productivity bar and click on the “Idle time” location you want to log as offline time.
- Fill in the fields of the “Offline Time” window, classify it as productive/unproductive/neutral, and save it.
- You’re done!
Note! This feature has a setting to control how it functions. Account administrators can toggle whether the manually entered offline times by employees are automatically approved by the system. For example, whenever an employee does enter offline time, it’ll become a request that a manager will need to review and either approve or decline in order for it to become a part of an employee’s productivity data.
On a mobile phone, the feature is the same, but the process of how to use it is somewhat different:
- Open the app and tap “Assign offline time”
- Choose the offline time you want to define
- Indicate what you were up to
- Tap “Assign offline time” again
Read our complete guide (with screenshots!) on how to use the mobile version’s offline time tracker.
4. Follow your productivity on “My DeskTime”
Both on the desktop and mobile versions, you’ll find a section called “My DeskTime.” This is where you can see your own productivity stats.
The only difference of the “My DeskTime” function between the desktop and mobile versions is this:
On the desktop version, you can view your productivity data by day, week, or month. On the other hand, the mobile version only offers a daily overview of your productivity.
Other than that, the displayed information is the same. You can see things like:
- What time you arrived at work and what time you left
- Productive time – the total time you’ve spent on productive websites, programs, and apps
- DeskTime time is important – the total time spent online at the computer
- Time at work – the total time spent at work
- Average productivity and effectiveness, calculated in percentages
- Productive, unproductive, and neutral apps used during the day
- And more.
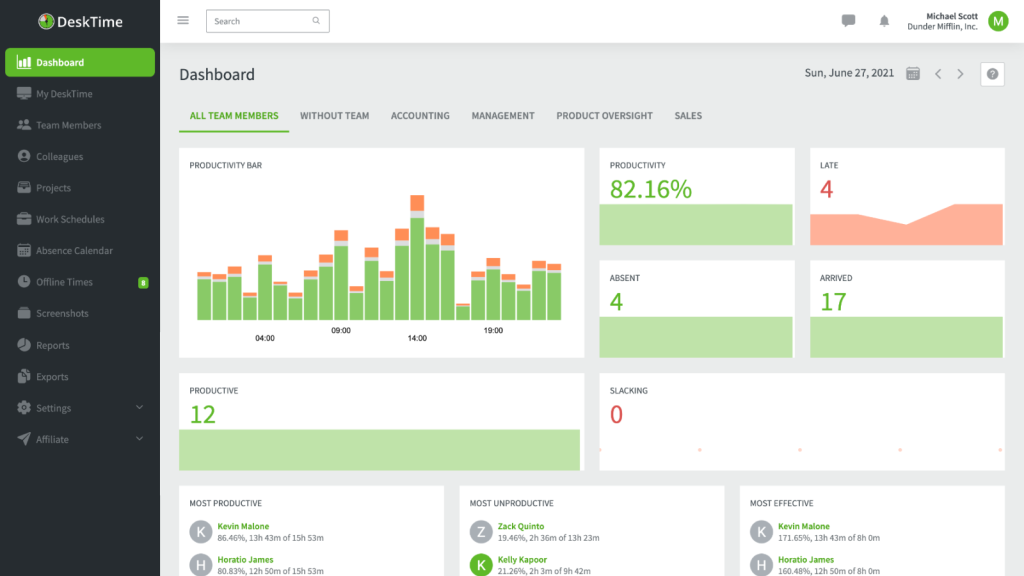
5. Have a quick overview of your team’s performance on “Dashboard”
Another section you’ll find both on the desktop and mobile versions of DeskTime, is “Dashboard.” This is where you can see daily stats about your team’s performance, such as:
- Average productivity of your team
- How many have been late that day
- How many are at work and how many are absent
- Your most productive and unproductive team members
- And more.
This section is exactly the same and offers the same functionality on both desktops and mobile phones.
Note! “Dashboard” is only visible to account owners and admins.
6. Visit the “Team members” section to check up on your employees
“Team members” is a section on the mobile app and the desktop version of DeskTime, which gives you an overview of each of your employees’ performance on the specific day.
It functions the same way on both versions of DeskTime and gives you an overview of:
- Who’s online and who’s not
- Who’s at work and who’s absent
- Live information of what website, program, or app is being used at the specific moment
- Time of arrival and total time spent at the computer
- And more.
Note! “Team members” is only visible to account owners and admins.

Want your business to thrive?
Boost your team’s productivity and efficiency ratings with time tracking!
5 features and functionalities only available on DeskTime for desktops
As mentioned right at the beginning of this article, from the DeskTime’s desktop version you can access significantly more features and functionalities than from the mobile app. Here are the most notable ones:
- Shift scheduling
- Absence calendar
- Exports
- All account settings (incl. enabling of certain features, such as screenshots and others)
Note! What is visible to you depends on the subscription plan and your user level (owner, admin, or employee).
Before we go over the aforementioned features and functionalities, we’d like to note that some of them must be turned on in the settings in order for them to be accessible. We’ll cover that at the end.
Now, let’s take a look at these features and functions that are only available when using DeskTime on a desktop computer:
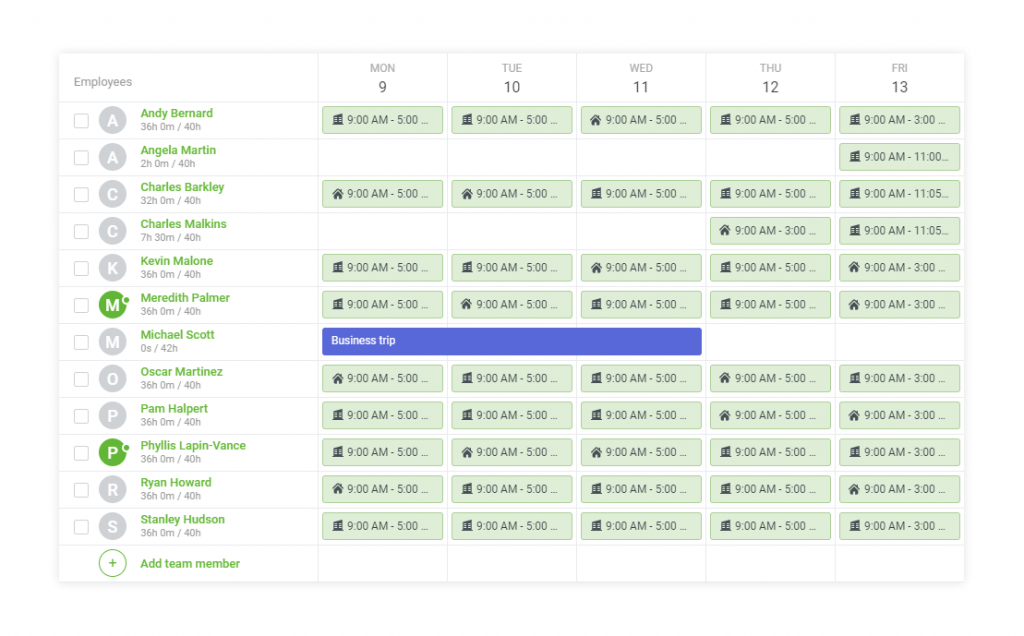
1. Shift scheduling – for the organization of employee hours
Shift scheduling is designed to not only make it easy for you to track who is working when but also make it easy for your employees to decide which shifts they’d like to work by requesting specific time slots.
This feature not only lets you plan shifts not only time-wise, but also location-wise. It means that when creating a shift you can indicate whether the specific employee needs to work from the office or remotely.
Because of its easy-on-the-eyes layout, you and your employees will never be confused about anyone’s hours and work places again.
Read how to create shifts with DeskTime’s Shift scheduling feature in this blog article.
Feature availability
- Subscription level: Premium & up
- Available to administrators? ✅
- Available to employees? ✅ (limited availability)
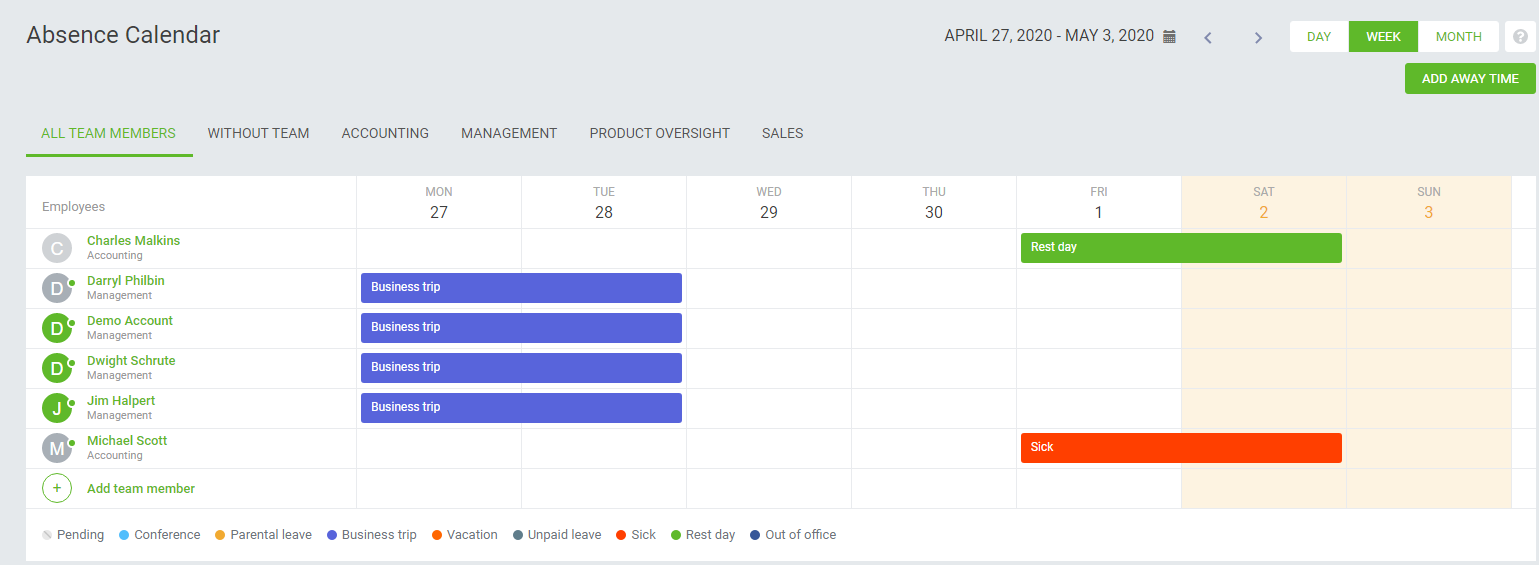
2. Absence calendar – a tool for tracking and requesting time outside the office
The absence calendar is similar to the work schedules section except that instead of setting shifts, this calendar tracks time away from the office for things like business trips, sick days, and vacations.
Note that after setting up the absence, it’s possible to go back to the calendar to edit its parameters. Also, if there’s any pending time, it’ll be shown as a grey box with angled lines across it which can be clicked by an administrator for approval or rejection.
Read more about DeskTime’s Absence calendar feature here.
Feature availability
- Subscription level: Premium & up
- Visible to administrators? ✅
- Visible to employees? ✅
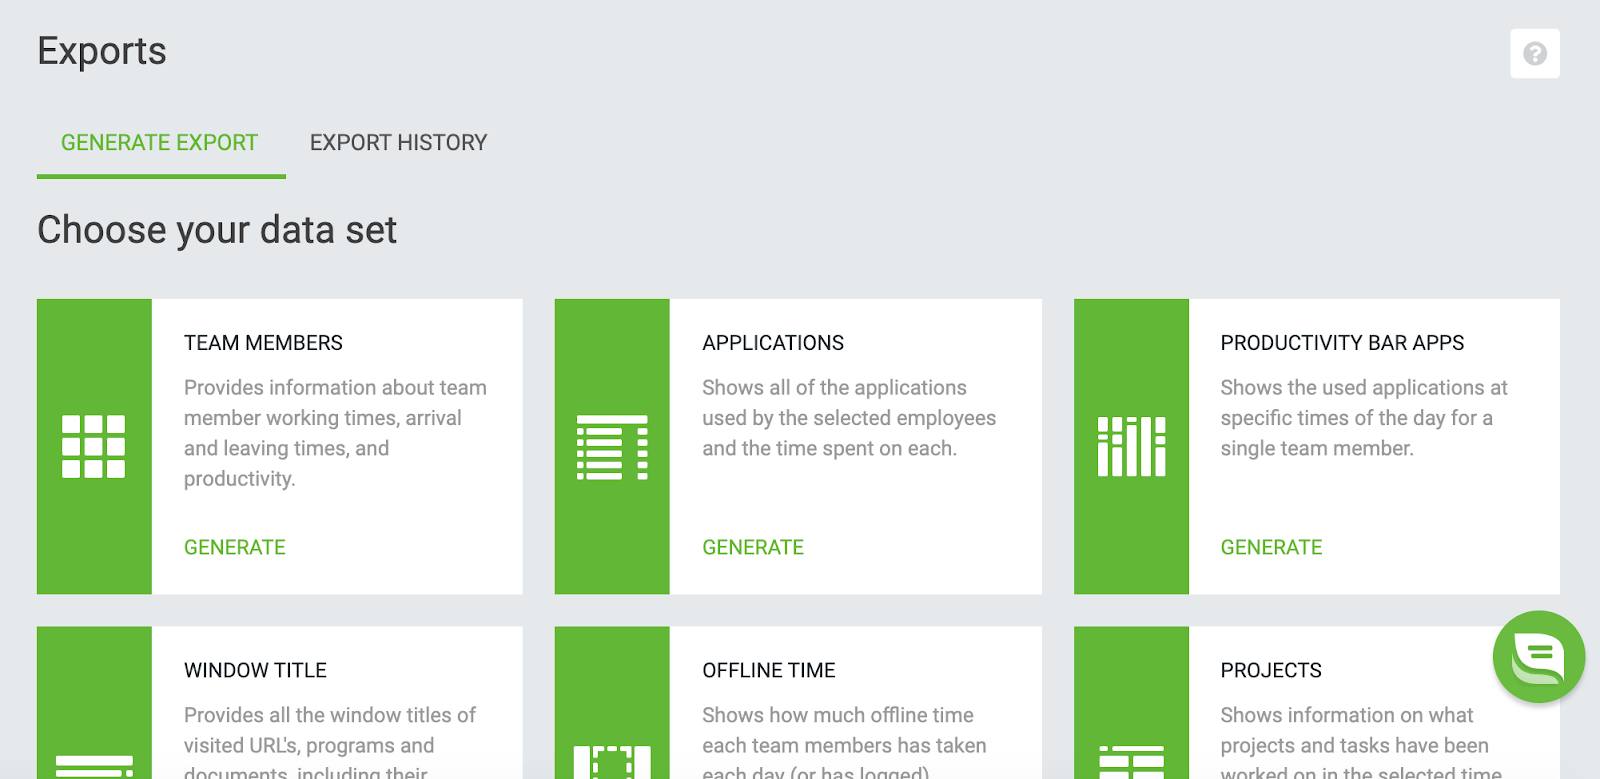
3. Exports – for grouping and saving historical productivity data in a convenient file
DeskTime’s exports section is for company administrators to compile and export productivity-related information belonging to employees and teams into an XML or a CSV file.
These files can then be easily downloaded, printed, and shared within or outside the company. Some examples of what can be exported include applications, absences, work schedules, window titles, and much more.
Read more about the Exports feature and how to use it in this article.
Feature availability
- Subscription level: all
- Available to administrators? ✅
- Available to employees? ❌(for self only)
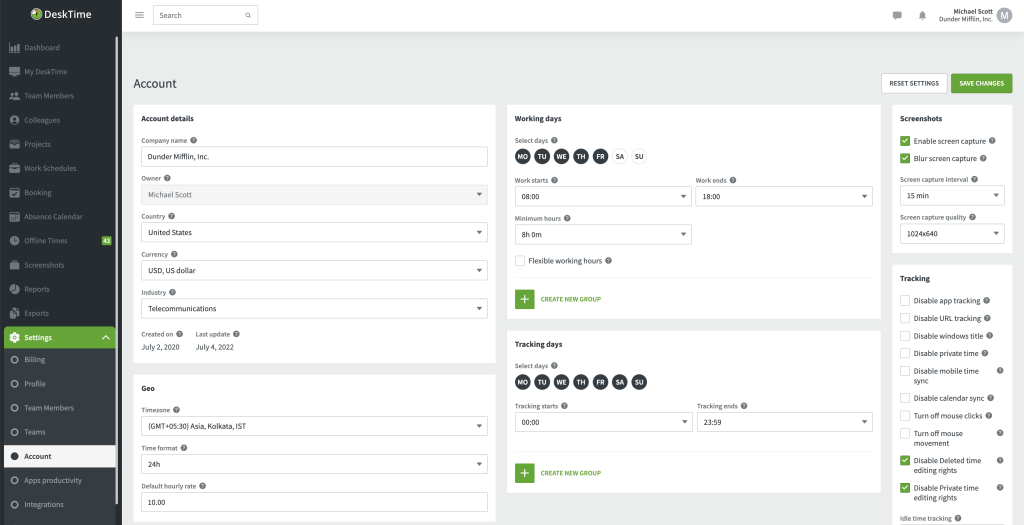
4. Account settings – for viewing and changing settings, including feature functions
Unlike the mobile version, DeskTime’s desktop version has many more controls depending on the user’s level (employee, administrator, or account owner). For example, setting of working days, tracking days, and other account settings can only be changed here.
Some of the DeskTime features that work on the desktop version must also be enabled or disabled here, such as:
- Screenshots – capture your employees’ computer screens at 5, 10, 15 or 30 minute intervals
- Private time – allow your team to turn on this feature to stop time tracking and safely do some personal things on work time
- Offline time approval – if enabled, employee offline time requests will need to be approved by admins
- URL tracking – disable this feature if you don’t want to track websites visited by your employees
- Window title tracking – disable this feature if you don’t want to track window titles of documents, emails, etc. that you and your employees are working on
- Calendar sync – enable this function if you use one of the calendar app integrations (Google Calendar or Outlook Calendar) and want all your calendar events to be automatically added to DeskTime
- Mobile timer sync – disable this feature if you don’t want the time tracked on your mobile device to be added to the total desk time
The settings section is also where the company owner can add and delete team members, decide what applications belong in which category of productivity, and decide on which integrations to use.
Feature availability
- Subscription level: Pro & up
- Available to administrators? ✅
- Available to employees? ❌
Answering the question: which one is right for me?
The answer to this is simple:
If you work from the office, the desktop app will be best suited for you, as it gives you access to all features DeskTime’s got to offer.
Whenever you travel, consider using DeskTime’s mobile app. As a manager or company owner who is not always around the office, you may want to use the mobile version to give yourself a peace of mind by knowing the status of your workers even if you’re mainly a user of the desktop version for your work.
We hope this article was informative and enjoyable and has helped you understand the differences between DeskTime’s mobile and desktop versions!
Did you find this article useful? Give it a clap!
Psst! You can clap more than once if you really loved it 🙂